 |
 01-03-2017, 10:18
|
#1
|
|
Registered User

Join Date: Oct 2014
Location: San Francisco
Boat: Outremer 55 Light
Posts: 70
|
Hard Foam Core Bimini Construction Advice
Hey there folks, I'm in the detailed planning/testing phase before I pull the trigger on buying materials to build my own hard bimini for my cat. I'm looking for some wisdom on a few of the construction challenges I've been thinking about.
Some background: - The bimini is basically large flat trapezoid thats 13'x9'. Its supported by a steel frame along its entire permiter as well as some steel supports that cross through the center. A top down drawing of the support frame is below.
- I'd like to ensure that the top surface is finished very well which means a female mold I believe. Any other options?
- I'm new to fiberglassing. I've been doing some experiments to build confidence but bare with me
- My goals for the bimini are to make it as light as possible, to make it possible to walk on the center portion regularly for dealing with the main sail, and to make it look damn fine
Some of the things I've been mulling over but don't have a good resolution yet:
1 - Whats are best practices for replacing portions of the foam core with wood pieces to reinforce sections for attachment/through bolts? Does the foam have to be replaced before it is layed up on the first skin or is there a clever way to replace foam after the it is laid up on the first skin, but before the second skin?
2 - Any ideas about how to finish the edges with a 45 degree lip shown below? Few things that have been flummoxing me as I've been thinking about it: - Needs to be light. Making it out of wood with 2-3in of horizontal core replaced would be 30-40lb+
- Needs to support the awning track with a bunch of sunbrella attached to it (lots of windage)
- I'd like to ensure that the top surface is smooth and "seam" free
3 - I'd like to run wires inside the foam core for lights/speakers. Is 0.75" too thin for this?
Cheers and thank you for the wisdom folks,
Eric


|

|

|
|
01-03-2017, 10:24
|
#2
|
|
Registered User

Join Date: Dec 2007
Boat: Mahe 36, Helia 44 Evo, MY 37
Posts: 5,731
|
Re: Hard Foam Core Bimini Construction Advice
Are you sure you wouldn't just want to have these guys make one and ship it to you.
Dedicated Marine
Dedicated Marine HOME - Dedicated Marine Bimini Hardtop
phone: 888-769-7677
Facebook “Biminihardtop"
|
|
|
|
|
01-03-2017, 18:36
|
#3
|
|
Resin Head

Join Date: Aug 2007
Location: Seattle WA
Boat: Nauticat
Posts: 7,205
|
Re: Hard Foam Core Bimini Construction Advice
Quote:
Originally Posted by elaak

Hey there folks, I'm in the detailed planning/testing phase before I pull the trigger on buying materials to build my own hard bimini for my cat. I'm looking for some wisdom on a few of the construction challenges I've been thinking about.
Some background: - The bimini is basically large flat trapezoid thats 13'x9'. Its supported by a steel frame along its entire permiter as well as some steel supports that cross through the center. A top down drawing of the support frame is below.
- I'd like to ensure that the top surface is finished very well which means a female mold I believe. Any other options?
- I'm new to fiberglassing. I've been doing some experiments to build confidence but bare with me
- My goals for the bimini are to make it as light as possible, to make it possible to walk on the center portion regularly for dealing with the main sail, and to make it look damn fine
Some of the things I've been mulling over but don't have a good resolution yet:
1 - Whats are best practices for replacing portions of the foam core with wood pieces to reinforce sections for attachment/through bolts? Does the foam have to be replaced before it is layed up on the first skin or is there a clever way to replace foam after the it is laid up on the first skin, but before the second skin?
You can use a small router/laminate trimmer to route for reinforcements after the core is laid on the outer skin.
2 - Any ideas about how to finish the edges with a 45 degree lip shown below? Few things that have been flummoxing me as I've been thinking about it: - Needs to be light. Making it out of wood with 2-3in of horizontal core replaced would be 30-40lb+
- Needs to support the awning track with a bunch of sunbrella attached to it (lots of windage)
- I'd like to ensure that the top surface is smooth and "seam" free
Bulid the 45 lip into your mold. Then glass a thin piece of aluminum into it and drill and tap fasteners into that.
3 - I'd like to run wires inside the foam core for lights/speakers. Is 0.75" too thin for this?
No, I've built a great many tops and often run wireways as low as 1/2" core.
Cheers and thank you for the wisdom folks,
Eric
|
To run wireways you build the mold, laminate the outer (top) skin, apply the core to the inside of the top skin, route for reinforcements and waterways, then install PVC pipe with an OD that matches the core thickness in your wireway channels. This can be done with string running through the pipe BEFORE it's glassed in, to facilitate wiring down the road. This method allows you to replace wire in the top as needed with no trouble, for future hardware changes or trouble shooting. Just lay the PVC pipe in your routed channels, fit, hot glue in place so it lays flush, and fill over with core bond or similar (whatever you used to apply the core). Then laminate inside skin.
__________________
O you who turn the wheel and look to windward,
Consider Phlebas, who was once handsome and tall as you.
|
|
|
|
|
01-03-2017, 18:37
|
#4
|
|
Resin Head
Join Date: Aug 2007
Location: Seattle WA
Boat: Nauticat
Posts: 7,205
|
Re: Hard Foam Core Bimini Construction Advice
Oh, and I'd adjust that laminate schedule. 
__________________
O you who turn the wheel and look to windward,
Consider Phlebas, who was once handsome and tall as you.
|
|
|
|
|
01-03-2017, 22:09
|
#5
|
|
Registered User
Join Date: Oct 2014
Location: San Francisco
Boat: Outremer 55 Light
Posts: 70
|
Re: Hard Foam Core Bimini Construction Advice
Thank you minaret. Good stuff! So the PVC pipe you've used for wire channels seriously goes through the whole core? I would think that i would create a stress concentration point. But if it works, great!
Any guesses on what a laminate schedule for something like this might be? Was planning to make samples this weekend to get a feel for what'll work.
Cotemar, its not a bad idea and I'll definitely RFQ the design with a local boatyard and a few others. I'm pretty keen to make it myself though if for nothing else than the experience of putting something together with fiberglass.
On number 2 above, I think I've figured out a decent technique for making it happen with minimum sanding and the ability to use a completely flat table as a mold. Attached a summary of the steps I'm thinking.
Cheers,
Eric

|
|
|
|
|
01-03-2017, 22:55
|
#6
|
|
Resin Head
Join Date: Aug 2007
Location: Seattle WA
Boat: Nauticat
Posts: 7,205
|
Re: Hard Foam Core Bimini Construction Advice
Quote:
Originally Posted by elaak
Thank you minaret. Good stuff! So the PVC pipe you've used for wire channels seriously goes through the whole core? I would think that i would create a stress concentration point. But if it works, great!
Any guesses on what a laminate schedule for something like this might be? Was planning to make samples this weekend to get a feel for what'll work.
Cotemar, its not a bad idea and I'll definitely RFQ the design with a local boatyard and a few others. I'm pretty keen to make it myself though if for nothing else than the experience of putting something together with fiberglass.
On number 2 above, I think I've figured out a decent technique for making it happen with minimum sanding and the ability to use a completely flat table as a mold. Attached a summary of the steps I'm thinking.
Cheers,
Eric
|
Depends on resin system but in poly iso I'd do two 1708 on the top skin with two CSM, one to start and one to finish. Then I'd bag core in Core Bond. Then I'd laminate inner skin with one 1708 and two CSM with a peel ply.
I'd also skip the wood piece and the added layup and fairing and build a laminate table with exactly the shape desired for the outside of the finished piece. I'd build it with Melamine with a plastic laminate facing, at least 3/4" thick and with substantial framing. Glossy white is easiest to find and dirt cheap but it sucks laying up on white, go with black or any color other than white if possible. Fair out all joints carefully (I'd use Master Wax Fillets but this is beyond the average user). Then apply several coats of a good paste release wax like Partall paste #2. Then spray with gelcoat to about 30 mils WFT. Laminate the outer skin while the gel is still slightly tacky. Give it a light sand/grind for drips etc to ensure a flat surface. Then trowel on Core Bond (preferably catalyzed with BPO) with a notched trowel and either vaccum bag the core in place (preferred) or use plastic sheet and lots of weights to ensure the core is flush. I ALWAYS drill holes about 1/4" diameter in about a 1' square grid pattern on core to allow squeeze out of excess bonding material and ensure no hydraulic lock and core flush against outer skin. Make sure you get squeeze out out of all pressure relief holes and edges/seams if not vacuum bagging. Allow core bond to partially cure and pull weights or vacuum bag at green trim stage (usually several hours). Use green trim stage to trim excess squeezeout with a chisel and razor. Allow to cure overnight and carefully sand fair. Then laminate inside skin. I would bond a piece of 1/8" aluminum on to the inside of the core and laminate directly over it instead of wood trim around the edge, then drill and tap necessary fasteners into that. You probably don't even need to recess core for this, it would just be 1/8" thicker at the edge. You will then need to allow the part to fully cure for several days, pop it from the mold, and radius and glass the edges. I'd use 10 oz cloth in pre cut tapes rolls, 4" tape and 3" tape in two layers with CSM and a peel ply. Sand rough fair in 60 grit, then apply several coats of gel as primer and block fair in 120/180. Prep 400 dry for the blend, shoot color to match around the edge, wet sand out to 1200 and polish. JMHO.
__________________
O you who turn the wheel and look to windward,
Consider Phlebas, who was once handsome and tall as you.
|
|
|
|
|
01-03-2017, 23:02
|
#7
|
|
Resin Head
Join Date: Aug 2007
Location: Seattle WA
Boat: Nauticat
Posts: 7,205
|
Re: Hard Foam Core Bimini Construction Advice
You can also build the trim piece that goes around the edge of your table to give you the finish shape of the lip so it is easily removed after the gelcoat, outer skin, and core are done. Then you can wrap part of the inner skin laminate around the core edge, saving a step. If you do one 1708 and two CSM on the inner skin, you can have just the two CSM wrap the edge for an easy layup.
__________________
O you who turn the wheel and look to windward,
Consider Phlebas, who was once handsome and tall as you.
|
|
|
|
|
02-03-2017, 08:15
|
#8
|
|
Registered User
Join Date: Oct 2009
Location: Bermuda
Boat: Privilege 435
Posts: 586
|
Re: Hard Foam Core Bimini Construction Advice
I previously posted an account of the building of a hard top that I did. I hope you can pick up some tips. Don't hesitate to contact me if you want me to expand on anything.
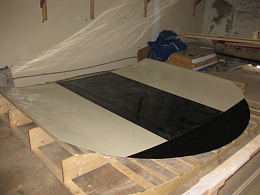
I recently built a hard-top for my Privilege 435. Having received a number of comments and requests for photos, I thought Id post an account of how the top was constructed.
The previous top was made of a stainless frame with a canvas covering. It was O.K but it seemed to be a bit of a mismatch with the sleek lines of the boat. Standing on it in order to gain access to the boom required a balancing act that made me look about as cool as a newly-born giraffe.
My pre-requisites were that I wanted the hard-top to be a professional looking job with a glossy gel-coat upper surface. I wanted to be able to put solar panels on top and I wanted lights built into the underside. It needed to be strong enough for two persons to walk on whilst only being supported at the edges; one support at each side and a pair of supports at the front and rear.
The top is 12 x 13 so in order to keep the weight down to an acceptable level, and in order to get the shiny topside, the only real way was to make a mold and create the top using foam (Divinycell), gel coat and resin.
Heres how it was done;
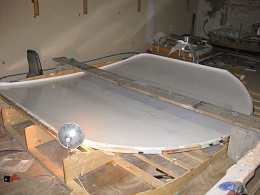
I started the mold by using a 12 length of 10 x 1 plank and copied the curve of the coach-roof onto the board. I then cut out the curve and made another seven identical planks. I supported the planks using 4x 2 and spaced them evenly so that the curve of the coach-roof was inverted to form one big bowl-shape. I then screwed some sheets of ¼ ply down onto the edges of the planks to form the bowl. At this point, it is important to get the bowl shape correct and smooth. Even though you will be covering it with laminate, any raised edges or indentations will show on the finished product and will be practically impossible to fix after the fact. Any screws that sit above the ply surface will be problematic so ensure that each screw pulls itself below the ply surface. Any indentations in the surface bigger than a screw head should be filled with spackling. If the curve of your top is gentle enough that you can use ½ ply go ahead and use that as it will form a better finished surface. After the top is finished, all of the mold will be discarded so use the cheapest products you can find to make the mold. There is no need for the added expense of micro-balloons, marine ply or stainless steel screws.
 Once you are satisfied with the shape and size of the ply mold, you are ready for the laminate. The laminate has a glossy surface and it is this surface that will act as a mold-release and give the smooth surface of the hard-top. Most hardware stores sell Wilsonart or Formica laminate. You need to purchase a dark color (Assuming that your top is white). The reason for this is that when you apply the gel coat, you will not see any thin spots or missing bits if your underlying surface is of a similar color. This is very important as the resin sets fairly dark in colour and any gel coat which is too thin will allow the resin to show through. (I used a couple of light coloured sheets for my project as seen in the photos as the hardware store had no dark-coloured sheets left).
Glue the laminate down onto your sheets of ply. Contact glue is the best glue for laminates but the only draw-back is that once it touches the ply, thats where its going to stay. To make this process easier, once both surfaces have been coated with glue and have dried to the touch, place a number of dowels or pieces of 1 x 2 across the ply, laying the laminate on top. You can then remove one piece of wood at a time pressing down the laminate as you go, thus ensuring that the laminate does not stick to the ply before you are ready for it to do so.
Because you cannot move the laminate once it has been laid, it is very difficult to get the edges abutted perfectly. The design of my top allowed for a margin of error here. My top is 13 wide and as the laminate is 4 wide, I needed just over three sheets to cover the width of the mold. I knew that once finished, the middle portion of the hard-top would require a non-skid application to allow access to the boom. This would be put onto the top after it had been removed from the mold, so as long as any imperfections made by the joints were in the middle 5 section of the top, they would be covered by the subsequent non-skid. This allowed for 4 at either side of the top to be uninterrupted glossy surface. A tip here relates to imperfections which have to be repaired once the top has been removed from the mold. It is easier to sand down gelcoat and buff it to a glossy surface than it is to mix up filler and patch any indentations. Therefore, in places like joints in the laminate, if you fill it with spackling prior to gelcoat, it is better to underfill the joint thus giving a raised portion of gelcoat on the removed top.
Once you have the laminate down, you will need to decide what sort of edge or lip that you want on your top. Having tried a few different shapes, I settled on a curved lip. I purchase a few lengths of 2 plastic plumbing pipe. I made up a jig on my bench-saw and cut it down the middle length-wise to give me one long continuous semi-circle. Having screwed down some wooden battens as a support for the pipe, I screwed it in place around the edge of the laminate.

If your top is not square in shape, you will need to ensure that the pipe is flexible enough to take the curves without them distorting. I realized a mistake that I had made after having affixed much of the pipe. I found that the pipe would not bend around the sharper curves at the back of my top. I had to replicate the shape by building up layers of bondo and spackling and then sanding out the inside curve. Although I was happy with the outcome, it was very time consuming and took ages to do. To fill the very small gap between the pipe and laminate, I ran a very small line of caulking.
Once you are happy with the mold you are ready to apply mold release. Mold release wax is available and priced similarly to car wax. I read lots of different accounts of how to apply mold release wax and whether or not to use PVA mold release agent. The PVA is painted on and dries to form a film on the surface of the laminate. I had read a few reports which said that although the PVA always worked well, it was very difficult to get a perfect finish as it leaves small brush marks on the surface which are replicated in the top. As I had spent much time getting my surface perfect, I didnt want to ruin it so decided to go without PVA. I applied the wax to the laminate in 5 x 5 sections at first, but found that it dried quickly and was difficult to remove even with an electric buffer. I reduced the size of the application to around 3 x 3 sections and by the time I had finished, it was ready to rub out. It seemed as though I was rubbing off all the wax that I had just put on and after two coats of it, I felt like that little fellow from Karate Kid. I applied two good coats on most areas and three on some. I also waxed the inside of the plastic pipe, paying particular attention to the bent edges. On the part that I had made out of filler (and then spray painted) I put three or four layers.
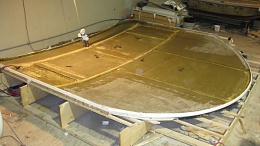
I was finally ready to start making the actual top. First up are a couple of layers of gel coat. Gel coat comes in two sorts, waxed and non-waxed. Waxed or non-waxed does not refer to the shine of the finished product. Gel coat when mixed with hardener never fully hardens when exposed to the air. For this reason, gelcoat is mixed with wax. As the gelcoat is applied, the wax rises to the surface of the gelcoat and seals it from the air allowing it to harden completely. The draw-back with this is that you now have a surface with wax on it so any further layers of resin or paint will have trouble adhering to it. When making a mold, you need the non-waxed gelcoat since both surfaces will be sealed; the bottom by the mold itself and the top by subsequent layers of gelcoat and fiberglass. Gelcoat can harden quite quickly so follow the mixing ratios and try a few quart-size mixtures first so you can judge the cure time based on your conditions. Having given the mold a final wipe down with a soft cloth to remove any dust I first mixed up a quart of gelcoat and brushed this onto the inside of the pipe, eventually building up several layers. I made sure that the areas which were curved had a few extra layers to allow me to fix any imperfections once the top had been removed from the mold. I found that I could mix up about two quarts at a time which would give me sufficient time to roll on the gel before it began to set-up and become gelatinous. If you roll the gelcoat on, be sure to use a short nap sleeve on the roller; you dont want a heavy nap soaking up all your gelcoat. Also, ensure that the sleeve is designed for epoxy paints or it will dissolve and fall apart. I applied two layers to the mold which used up two gallons of gelcoat. Once the gelcoat has set you are ready for the fiberglass.
Polyester resin is ideal for hard tops. There are a number of different types of fiberglass cloth. Chopped strand matt (CSM) is the fiberglass that has lots of little random strands in it. It flakes into pieces when you handle it and these tiny strands show up in your clothes, your tool box and several months later in your bed. It is strong when cured but not in any particular direction. Fiberglass cloth is much smoother to use and stays intact when handled. The cloth is made up of neatly crisscrossed strands and has greater strength in a lateral direction. Bi-axial cloth is made up of a combination of CSM and cloth and takes advantage of CSMs binding abilities and cloths lateral strengths. For this project I used 1.5oz chopped strand mat and bi-axial cloth.
The first layer down on the gelcoat should be CSM. Lay it out, cut it to shape and roll on the resin. Keep the resin spread thinly, do not let it puddle or it will dry brittle and just add extra unwanted weight. A rule of thumb is that 1 gallon covers 4.2 yards of 1.5oz CSM. Put plenty of layers on the inside of the edges. These edges are likely to take the brunt of people holding the top or any impacts. Let the first layer cure.
You will then need to cut to shape the divinycell. This stuff is expensive but there is nothing as strong and light which will serve the purpose for a project of this size. I used ¾ foam to ensure the strength of the top. Cut the divinycell to size using a sharp knife or jigsaw and leave it to one side. Next up is a layer of biaxial. Lay it out in the same way and coat it with resin. Roughly 1 gallon to 4 yards. While it is still wet, coat the underside of the foam with a thin layer of resin and lay it down on the biaxial. You will need to weigh it down with blocks to ensure that it takes the shape of the mold and to ensure that it adheres to the cloth. Make sure that there are no spots where air pockets can form between the foam and the cloth as this will weaken the structure.
After this has set overnight, you can apply one more layer of CSM and one more layer of biaxial in the same way.
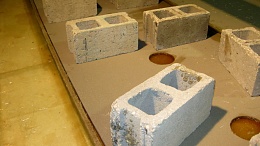
A friend at the local boat-yard gave me another tip here. I cut a few 6 holes into the foam and discarded the round plug prior to laying it onto the glass. Once it had cured, I filled the hole with several layers of CSM and biaxial. This served to effectively bolt the foam down. The strength of the top comes from the laminating process whereby the different layers cannot move laterally independently of each other. These solid round plugs help to glue the foam down and ensure that it cannot move laterally. At two points at either side of the top where the supports were to be secured, I made it from solid glass, laying up numerous layers of cloth. This way, I can really screw down tight on the retaining bolts without flattening any foam.
On the underside of my top I added LED white lights and a set of RGB lights. The white LEDs that I used were bright white which are good for lighting up the deck for projects or general lighting. I used six 3-watt recessed lights. In order to embed the lights into the underside, I applied another layer of ½ divinycell onto the mold as before leaving channels for the wiring for all of the lighting and for the solar panels. Once this was done, I covered the foam with another layer of CSM and biaxial. I am told that the ¾ foam alone would have probably been strong enough to walk on, but as I needed the depth afforded by the extra ½ foam, I was happy to have the extra strength to tip the scales from probably to certainly.
Some finishing was required prior to the big day when I would try to pop the top out of the mold. I used a grinder to remove the fiberglass that had protruded up from the edge. I could finish the edges properly later but at this stage the plastic piping gave a good straight line to level the fiberglass. I did some grinding on the underside of the top to remove any imperfections and gave it a coat of oil-based undercoat paint. (With hindsight, I would have gone with an epoxy undercoat). I was happy with the finish of the biaxial cloth and did not feel any need to fair the surface or have a perfectly smooth finish on the underside.
Next came the big moment when I would find out whether the top would pop out from the mold. I used a flat crow-bar to raise an edge and wedged a pool noodle into the gap. After three or four of these the whole top just separated from the mold without fanfare.
The top turned out great with the glossy finish that I had hoped for and only a few small holes to fill around the edges. It weighs somewhere in the region of 250lb, which is a fair bit of extra weight to put on the boat, but with the benefits it affords, I consider it to be worth it.
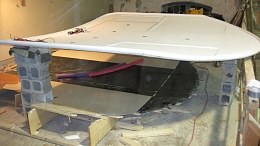
 Bermuda day12Hard-top1.JPG
Views: 223
Size: 113.6 KB
ID: 142305" style="margin: 2px" /> Bermuda day12Hard-top1.JPG
Views: 223
Size: 113.6 KB
ID: 142305" style="margin: 2px" />
I designed some supports for the sides and had them made up. Im very happy with the finished product; it looks professional and I think that it adds to the aesthetics of the boat. Ive added solarpanels, a cradle for the boom and have yet to apply the non-skid finish; but thats on the list of things to do
and its a very long list.
[ATTACH][ATTACH] [/ATTACH][/ATTACH] [/ATTACH][/ATTACH] 
|
|
|
|
|
03-03-2017, 03:31
|
#9
|
|
Registered User
Join Date: Mar 2010
Location: Alaska
Boat: Truant Triad 37 Cutter-Alaska, Leopard 40 Cat, Bahamas
Posts: 364
|
Re: Hard Foam Core Bimini Construction Advice
Outstanding work Privilege! Thanks for sharing. You and Minaret have provided a detailed education!
|
|
|
|
|
03-03-2017, 08:29
|
#10
|
|
Resin Head
Join Date: Aug 2007
Location: Seattle WA
Boat: Nauticat
Posts: 7,205
|
Re: Hard Foam Core Bimini Construction Advice
Quote:
Originally Posted by Privilege
If your top is not square in shape, you will need to ensure that the pipe is flexible enough to take the curves without them distorting. I realized a mistake that I had made after having affixed much of the pipe. I found that the pipe would not bend around the sharper curves at the back of my top. I had to replicate the shape by building up layers of bondo and spackling and then sanding[SIZE=4] out the inside curve. Although I was happy with the outcome, it was very time consuming and took ages to do. To fill the very small gap between the pipe and laminate, I ran a very small line of caulking.
|
In future, remember that you can get Master Wax Fillets in just about any size radius or chamfer. Bend in a batten at a right angle and then apply fillet as needed. This is how professional pattern tool & die makers do it. This method takes a bit of practice but is dramatically faster than any other, especially for complex compound curves and shapes. You can also get Master Wax sheet and carve it, but that is high end tool & die making.
This vid gives a fair idea:
https://www.freemansupply.com/produc...-strip-lengths
Master Wax finishes out to an extremely glossy smooth surface with perfectly blended edges using only a heated fillet ball and fillet scraper, no sanding.
__________________
O you who turn the wheel and look to windward,
Consider Phlebas, who was once handsome and tall as you.
|
|
|
|
|
03-03-2017, 13:20
|
#11
|
|
Registered User
Join Date: Oct 2014
Location: San Francisco
Boat: Outremer 55 Light
Posts: 70
|
Re: Hard Foam Core Bimini Construction Advice
Hi minaret, thanks again for the wisdom! With a lip built into the mold, how have you been able to manage the tight radii of a lip with the foam core? I've been concerned that building the lips in the mold will necessitate that the foam core be cut with extreme precision in order to get the first skin and foam to match perfectly.
Thank you as well Privilege! I remember finding your original thread and it has been a piece of my inspiration for trying to get it done myself. Thank you for the time well spent documenting your process.
Other question - I'm thinking of going with two layers of 5.6oz carbon without any glass on each side. What would be the downside other than cost? I made a few test pieces and they seem to be strong enough. The total weight for the 90sqft Bimini could maybe slide in below 100lb with this layup.
|
|
|
|
|
03-03-2017, 16:03
|
#12
|
|
Resin Head
Join Date: Aug 2007
Location: Seattle WA
Boat: Nauticat
Posts: 7,205
|
Re: Hard Foam Core Bimini Construction Advice
Quote:
Originally Posted by elaak
Hi minaret, thanks again for the wisdom! With a lip built into the mold, how have you been able to manage the tight radii of a lip with the foam core? I've been concerned that building the lips in the mold will necessitate that the foam core be cut with extreme precision in order to get the first skin and foam to match perfectly.
Thank you as well Privilege! I remember finding your original thread and it has been a piece of my inspiration for trying to get it done myself. Thank you for the time well spent documenting your process.
Other question - I'm thinking of going with two layers of 5.6oz carbon without any glass on each side. What would be the downside other than cost? I made a few test pieces and they seem to be strong enough. The total weight for the 90sqft Bimini could maybe slide in below 100lb with this layup.
|
Vacuum bagging the core helps a whole lot. I almost always bag core even when I'm not bagging the layups. It looks from your drawings like your lip will be more of a chamfer than a radius, hence simple.
Sometimes if there's a very complicated detail at the edge it can be an option to chamfer the core short of the edge 1 1/2" or so and then have the inner skin layup directly onto the outer skin, sometimes with an added CSM or two around the edge to make it thicker. This gives a solid glass edge with no exposed core and no separate layup around the edge. 
Keep it simple. Remember carbon is conductive as hell, hence maybe not the ideal material for a top unless sandwiched under glass. Just shoot for a super lean layup and your top will be very light. Also use core bond. It's extremely light and a little flexible, especially if BPO catalyzed. Just pick up a five gallon bucket of it, most people think it's empty the first time they lift one.
5.6 oz carbon is really thin, too. It may or may not provide the required panel stiffness over the span involved. If you're going to have people walk on it, a little overkill is in order. 20 lbs heavier but twice as strong and stiff is better, IMHO, although I certainly understand the impulse.
But if you care that much, go to an epoxy layup for carbon and bag it. Resin ratio, regardless of resin system, will have more effect than anything. That and your core bonding material of choice, which must be light. Bagging your core makes a big difference here too, as all excess core bonding material will be forced to squeeze out much more thoroughly and easily, and then be removed, resulting in a lighter part.
Regardless, have fun with it! 
__________________
O you who turn the wheel and look to windward,
Consider Phlebas, who was once handsome and tall as you.
|
|
|
|
|
03-03-2017, 16:10
|
#13
|
|
Resin Head
Join Date: Aug 2007
Location: Seattle WA
Boat: Nauticat
Posts: 7,205
|
Re: Hard Foam Core Bimini Construction Advice
6.4-6.6 lbs/gl. Pretty light!
http://www.fiberlay.com/upload/techd...G-0614001G.pdf
This product beats hell out of infusion bagging, as it results in a lighter part which is much more flexible without cracking/less brittle, and it is pumpable and bags quite well troweled on, with a long open time. You can take a big lump of it cured and smack it with a big hammer and it wont shatter, it's almost like a big lightweight chunk of hard rubber. Great stuff.
__________________
O you who turn the wheel and look to windward,
Consider Phlebas, who was once handsome and tall as you.
|
|
|
|
|
| Thread Tools |
Search this Thread |
|
|
|
| Display Modes |
Rate This Thread |
 Linear Mode Linear Mode
|
|
 Posting Rules
|
You may not post new threads
You may not post replies
You may not post attachments
You may not edit your posts
HTML code is Off
|
|
|
|
Advertise Here

 Recent Discussions Recent Discussions |
|
|
|
|
|
|
|
|
|
|
|
|
|
|
|
|
|
|
|
|
|
|
|
|
|
Vendor Spotlight |
|
|
|
|
|
|
|
|
|


