Cruisers Forum


Reply
  This discussion is proudly sponsored by:
Please support our sponsors and let them know you heard about their products on Cruisers Forums. Advertise Here
 
Thread Tools Search this Thread Rate Thread Display Modes
Old 06-05-2008, 14:15   #16
Senior Cruiser
 
Alan Wheeler's Avatar

Cruisers Forum Supporter

Join Date: Dec 2003
Location: Marlborough Sounds. New Zealand
Boat: Hartley Tahitian 45ft. Leisure Lady
Posts: 8,038
Images: 102
Quote:
Some of the newer formulations are a lot more job specific, but back in the old days.......
The same is true with Epoxy. There are some very very good epoxy mortar's around now. The old days, the issue was the epoxy had a different expansion rate and could crack the cement. Some of the new stuff today is better than the cement.
__________________
Wheels

For God so loved the world..........He didn't send a committee.
Alan Wheeler is offline   Reply With Quote
Old 07-05-2008, 19:47   #17
Registered User
 
Steve Kidson's Avatar

Join Date: Jul 2005
Location: Sydney, Australia
Boat: Hartley 32 RORC; Vixen
Posts: 193
Images: 10
Epoxy Putty

I used some manufactured and marketed by Ramset here in Australia. Part of its advertising blurb says it is suitable to fair and repair ferro-cement.

Not forgetting that boats are not the only structures built using ferro-cement. There have been many buildings constructed using this method. When I was a kid, our garage was built from ferro-cement, and there were quite a few of the same type of buildings in the area. Quite unique and a conversation starter.

In my boating experience, I have used it and it bonds well, sets hard, and seems to perform well. Downside is it is very difficult to sand when set, so part of the secret is to only put on just enough to fill, be slightly proud and minimse need for sanding.

Fair winds

Steve
Steve Kidson is offline   Reply With Quote
Old 12-05-2008, 14:39   #18
Registered User

Join Date: Jan 2008
Location: Hobart Australia
Boat: Hartley RORC 32
Posts: 119
I have found sanding this stuff is great using mask and angle grinder, cuts it well with about a 40 grit to shape and then go to eighty and so on
I have used the ramset product already, damn good product, goes off quick even in cold temp does not run too much, fantastic cover, no bubbling from rolling and easy to work with
will be hard over night with a late coating in the cool
hooked
hooked on water is offline   Reply With Quote
Old 12-05-2008, 19:26   #19
Registered User

Join Date: Nov 2005
Location: New Orleans
Boat: Nomoboat -- yay Gustav ;)
Posts: 248
Send a message via AIM to drew.ward
So are you guys saying I can't bond new cement to the existing cement? It seems like this should work and be the strongest bond.

Or is there some reason I would need to do an epoxy bond and then new concrete above?
__________________

drew.ward is offline   Reply With Quote
Old 12-05-2008, 22:58   #20
Senior Cruiser
 
Alan Wheeler's Avatar

Cruisers Forum Supporter

Join Date: Dec 2003
Location: Marlborough Sounds. New Zealand
Boat: Hartley Tahitian 45ft. Leisure Lady
Posts: 8,038
Images: 102
Yes you can bond new to old. In large area's of repair, that is the bet method. Just ensure you use the PVA bonding agent, or the new won't stick to the old. For small repairs, Epoxy mortars are effective and easy to use.
__________________
Wheels

For God so loved the world..........He didn't send a committee.
Alan Wheeler is offline   Reply With Quote
Old 13-05-2008, 07:13   #21
Registered User

Join Date: Nov 2005
Location: New Orleans
Boat: Nomoboat -- yay Gustav ;)
Posts: 248
Send a message via AIM to drew.ward
Thanks wheels

so my first project is going to be resurfacing the deck. I've got at least another month if not longer of scraping and scrubbing to get down to the raw cement. Should I plan to coat everything in PVA before pouring on the new skim coat of cement?

I'm basically repairing the edges where there was some rub damage and leveling everything out as the original deck was pretty uneven (they tried to level it with epoxy which I am now having to scrape off).

There will be a wood deck for the final surface, so this is mainly just to seal everything up nicely and make sure there are no weak spots I can't see.
__________________

drew.ward is offline   Reply With Quote
Old 13-05-2008, 22:45   #22
Senior Cruiser
 
Alan Wheeler's Avatar

Cruisers Forum Supporter

Join Date: Dec 2003
Location: Marlborough Sounds. New Zealand
Boat: Hartley Tahitian 45ft. Leisure Lady
Posts: 8,038
Images: 102
I have just used for the first time, some sanding discs. They are a fibrous material like a very course scotch brite type material. Man do they cut paint back quick. Quite expensive when compared to any sanding disc. But they last longer and are very fast. They even bite in the cement. You simply use an angle grinder with one of these and it will rip the paint right off very fast. Interestingly, they do not rip into timber so fast and allow you to remove the paint of timber without damaging the timber.
__________________
Wheels

For God so loved the world..........He didn't send a committee.
Alan Wheeler is offline   Reply With Quote
Old 14-05-2008, 01:53   #23
Senior Cruiser
 
GordMay's Avatar

Cruisers Forum Supporter

Join Date: Mar 2003
Location: Thunder Bay, Ontario - 48-29N x 89-20W
Boat: (Cruiser Living On Dirt)
Posts: 49,382
Images: 241
Quote:
Originally Posted by Alan Wheeler View Post
I have just used for the first time, some sanding discs. They are a fibrous material like a very course scotch brite type material. Man do they cut paint back quick. Quite expensive when compared to any sanding disc...
Alan:
Did you intend to say sanding FLAP discs & wheels?
Attached Thumbnails
Click image for larger version

Name:	Sanding Flap discs & wheels.jpg
Views:	340
Size:	54.8 KB
ID:	3566  
__________________
Gord May
"If you didn't have the time or money to do it right in the first place, when will you get the time/$ to fix it?"


GordMay is online now   Reply With Quote
Old 14-05-2008, 03:24   #24
Registered User

Join Date: Nov 2006
Posts: 976
Images: 6
The ones on the left hand side of the graphic that gord has put up are fantastic. As fast as an angle grinding disc but with way more control. If you use very light pressure, place a finger between the angle grinder and the surface and then rock the disc down onto the area to be stripped it is fantastic. It has saved me heaps of sanding discs . The scotch brite disc may be another thing though. There is another product that is a "honeycomb" of fibers that you can use in a similar way .
cooper is offline   Reply With Quote
Old 14-05-2008, 13:15   #25
Senior Cruiser
 
Alan Wheeler's Avatar

Cruisers Forum Supporter

Join Date: Dec 2003
Location: Marlborough Sounds. New Zealand
Boat: Hartley Tahitian 45ft. Leisure Lady
Posts: 8,038
Images: 102
Quote:
Did you intend to say sanding FLAP discs & wheels?
No not Flap discs. They sand the wood as good as the paint.
Arrr, just found an image. There are many different versions to fit different tools. [IMG]file:///C:/WINDOWS/TEMP/moz-screenshot-2.jpg[/IMG]
3M eStore: Scotch-Brite Clean and Strip XT Disc
__________________
Wheels

For God so loved the world..........He didn't send a committee.
Alan Wheeler is offline   Reply With Quote
Old 14-05-2008, 14:31   #26
Registered User

Join Date: Jan 2008
Location: Hobart Australia
Boat: Hartley RORC 32
Posts: 119
Those flap discs wear out quicker than the pads wheels is talking, but I had problems with the pads wearing out too quick when samding on the coated concrete
the coating only they were great, but when sanding rough concrete patches through the concrete wore out very quick - 2m2 max
the straight sheets going onto a rubber pad on the grinder 22 to 36 grit I found did the best job in this instance and lasted longer and cheaper
have gone through maybe 100 so far though in various sanding requirements
cheers
hooked
hooked on water is offline   Reply With Quote
Old 14-05-2008, 15:41   #27
Registered User

Join Date: Nov 2005
Location: New Orleans
Boat: Nomoboat -- yay Gustav ;)
Posts: 248
Send a message via AIM to drew.ward
I was planning on just using wire brush wheels. Currently I am literally chiseling off the layers of epoxy and paint a couple of inches at a time.

It's so thick that I'm pretty sure one of these other brushes would just melt the crap layers and make it tougher to get off the cement.

If anybody has any recommendations on an easier way to get this stuff off I'd def listen.
__________________

drew.ward is offline   Reply With Quote
Old 14-05-2008, 18:39   #28
Registered User

Join Date: Jan 2008
Location: Hobart Australia
Boat: Hartley RORC 32
Posts: 119
I would be careful about using a wire wheel, they tend to just polish the area and leave a carbon film on the surface
hooked on water is offline   Reply With Quote
Old 14-05-2008, 19:29   #29
Registered User
 
yachtrodney's Avatar

Join Date: Dec 2007
Location: Botany Bay Australia
Boat: custom 75' ferro yacht
Posts: 98
Images: 32
Meshing - Cutting - Joining - let's get simpler

Dear Drew.Ward

I suppose it was only going to be a matter of time before I stuck my head up - and threw in my 2 cents worth as well.

I have to say firstly that having read the whole thread, I am still having a bit of difficulty picturing exactly what you're trying to do. You said you wanted to raise the deck level to give yourself more headroom in the aft cabin - and I was wondering if you could tell me:

- are you trying to cut around the hull itself - or the existing cabin top, or the horizontal deck?

- what are you intending to rebuild and in what material?

- can you provide any photos so that we can see just what we are dealing with?

Just a couple of observations on previous comments - it's well known from my thread comments on the cutting of this yacht that I do not favour trying to 'chip back the cement' to expose the existing mesh and rods - and then attempting to cut this and weave in new areas of mesh and steel - and then re-plaster it all. I believe the time and effort involved and the difficulty in trying this, is not justified. And this is from someone who has meshed, tied and cemented (for more than 4 years) more than most of us would ever want to see in a lifetime. (Unlike a 60' Ferro that was here recently that legend has it - was completely cemented in 1 DAY using 15 plasterers and 80 helpers).

It can certainly be done - and the new wet mortar can be satisfactorily bonded to the old by using a 'hydrophylic' (water friendly) epoxy resin. My entire 75' ferro yacht was cemented by me alone - in large sections - over several years - using a straightforward method of both inside and out - overlaps of cementing, through the many layers of mesh - and copious quantities of this special resin - splashed and painted over the rough moonscape surface of the old meshed concrete edge. The resulting join which was sometimes done 6 months later - as the sections cemented were alternated from side to side and front to back (for weight and curing reasons) was trowelled so that the final joined area was more than a foot wide and this resin blends perfectly with both fully wet new mortar - and soaks in to the old dry.

I honestly believe that the sections of these joins - are stonger than the normal cemented areas. It is not possible for any crack to ever develop - because of the very nature of the jagged nippled moonscape surfaces involved - over such a wide area - with multiple layers of mesh - and there is just nowhere for a crack to form or follow.

It's hard to describe - and I will see if somewhere I can find a photo that shows it.

But, if you are going to remesh and rejoin new to old cement - then I would suggest you talk to a local epoxy manufacturer and tell them precisely that - and see if they have a similar product. The resin I used I obtained from a local manufacturer and friend Les Baker at Norglass Laboratories (NORGLASS LABORATORIES - | Marine Paints | Specialty Finishes |) - it had no specific trade name - and was specially provided to me for the wet on dry method of construction - and I found it just amazing how it would perfectly blend and work with both being trowelled together. I suppose it could be similar to an underwater curing epoxy.

I have no experience in using the PVA based product that Alan mentions so will not comment.

*********************************

Truly though - I would recommend that if possible - you cut the section of deck or cabin top - and either raise it higher using steel plates, bonded and bolted to the 2 sections. Or, that you cut off the cabin top and rebuild it in glassed ply - bonded to the remaining deck. Although, every bit of my hull and superstructure is ferro-cement - and there has been no problem - I think if I was doing it again - I would end the decking at the cabin edge lip and build the cabins and superstructure in wood or similar - both for lightness in weight up top - and ease of working. It is a simple matter to bond and bolt to the deck and build from there.

Many a ferro-cement hull is actually built this way - with only the outer hull - and part of the deck being built in ferro - and then all the deck and top sections in timber or ply. Ferro-cement bulkheads below providing the cross hull bracing strength.

Again I say - can you please provide some more specific details of what you are actually doing to the hull?

*********************************
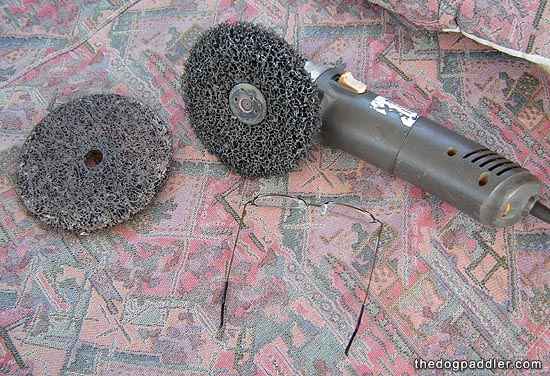
The 3M scourer discs Alan mentions are just excellent - and I have been using them for several years - but primarily to polish stainless steel - all the railing, fabricated fittings - and now the 316 ss plates going around the hull - are 'polished' using them - they give a very attractive, finely brushed shiny finish. They are also excellent for stripping back any type of paint - and I have recently lent my grinder and discs - to a few people in the shipyard who were stripping back bottom paint - using other types and methods - and they have been astounded at the efficiency and ease of these woven black scourer discs.

They must be used on a variable speed grinder - and cannot be run at more than 3-4000 rpm otherwise they will just fly apart - DO NOT attempt to run them on normal grinders at high speed - as they will disintegrate instantly and could cause harm. I use a Ryobi variable speed (only a cheapie) I've had for many years - and it's been worked into the ground - and still going - a great ad for them really.

Here is a photo of mine taken a few minutes ago - these are 150mm discs - the one on the left is a different brand - stiffer and more suited to stripping - it's a 3M one on the grinder now - that I've been using to clean up the SS hull plates I'm putting on. They cost about $20 each here. I was actually first introduced to them by a stainless steel Polisher tradesman.


They will not melt themselves or the paint or job - if you only run them at the recommended speed or slower - you will soon see what is the optimum - and using them too fast will cause them to heat and leave a black smear - but if used correctly will have no trouble stripping paint from the deck or timber back to bare.

Like all grinding or scouring discs - if you are going to use them on stainless - you should only use SS grinding discs - and do not use these scourers on both ordinary steel and then SS - you will contaminate the SS surface with minute ferrous particles that will cause the SS to show rust spots. Keep one aside - just for SS.

******************************************

Can you send us - or me (at rodneyfield@thedogpaddler.com) - any photos of what you are doing at present with the 'chiselling' of the deck?? It sounds like an 'ugly' scene to me.

As I've often said in the past 'I threw in my 2 cents worth - and it was thrown back out - for what it was worth'. But at least it was given in good faith - it's up to you always - to still decide what you want to do.

regards

Rodney
yachtrodney is offline   Reply With Quote
Old 15-05-2008, 04:44   #30
Registered User

Join Date: Nov 2006
Posts: 976
Images: 6
Quote:
It can certainly be done - and the new wet mortar can be satisfactorily bonded to the old by using a 'hydrophylic' (water friendly) epoxy resin. My entire 75' ferro yacht was cemented by me alone - in large sections - over several years - using a straightforward method of both inside and out - overlaps of cementing, through the many layers of mesh - and copious quantities of this special resin -

this is what I was talking about....
cooper is offline   Reply With Quote
Reply

Tags
ferro

Thread Tools Search this Thread
Search this Thread:

Advanced Search
Display Modes Rate This Thread
Rate This Thread:

Posting Rules
You may not post new threads
You may not post replies
You may not post attachments
You may not edit your posts

BB code is On
Smilies are On
[IMG] code is On
HTML code is Off
Trackbacks are Off
Pingbacks are Off
Refbacks are Off


Similar Threads
Thread Thread Starter Forum Replies Last Post
Ferro Boat Insurance in Australia hooked on water Dollars & Cents 49 07-03-2011 13:36
Ferro Boat Insurance problem! davovivo Meets & Greets 14 24-01-2008 23:45
Cutting the Back Stay wind rose ll Marine Electronics 32 08-06-2007 17:17
Cutting the ties that bind us NoTies Liveaboard's Forum 33 07-02-2007 17:54

Advertise Here


All times are GMT -7. The time now is 09:39.


Google+
Powered by vBulletin® Version 3.8.8 Beta 1
Copyright ©2000 - 2024, vBulletin Solutions, Inc.
Social Knowledge Networks
Powered by vBulletin® Version 3.8.8 Beta 1
Copyright ©2000 - 2024, vBulletin Solutions, Inc.

ShowCase vBulletin Plugins by Drive Thru Online, Inc.