 |
|
 30-10-2020, 13:19
|
#61
|
|
Registered User

Join Date: Apr 2016
Location: Indonesia
Boat: Outremer 55L
Posts: 3,810
|
Re: Dyneema rigging on a budget
Quote:
Originally Posted by Benz

There is a Dutch company making T-fittings in all sizes. Forget the name..."Blue wave"? Can't find them online, but I'll come back with their name when I find it. We splice dyneema directly to the bail for running backstays all the time. |
https://bluewave.dk/productcategory/rope/
Unfortunately the Blue Wave terminal fittings are for smaller sizes only (to 8mm). They custom make larger sizes, but not sure if more than 12mm. They do look a sexy, yet expensive, way to terminate fibre lifelines though.
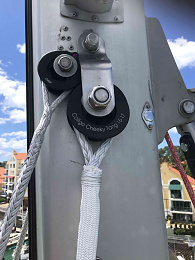
Colligo make their Cheeky Tangs for both through bolt and t-fitting. https://www.colligomarine.com/produc...angs-t-fitting
Again, not quite DIY, but they do provide a nice big bearing surface for the eye splice.
Attachment 226157
|

|

|
|
30-10-2020, 14:00
|
#62
|
|
Registered User
Join Date: Jan 2011
Location: Geelong, Victoria, Australia
Boat: Hunter 40
Posts: 218
|
Re: Dyneema rigging on a budget
All this talk of not being able to tension using lashings........why use lashing at all? Use turnbuckles! I did.
__________________
Regards Craig
|
|
|
|
|
30-10-2020, 14:10
|
#63
|
|
Registered User
Join Date: Jun 2007
Location: Manly, Qld
Boat: Norseman 447
Posts: 423
|
Re: Dyneema rigging on a budget
Quote:
Originally Posted by Biggfell
Some really good info on here and previous forum threads. Just what Im looking for.
Im just starting to spec my rig replacement and as a keen DIYer this thread is great.
I definitely want to change to Dyneema as I can regularly inspect it myself (I hate the never really knowing with SS), I can maintain it myself, itll save weight & hopefully save me money on the replacement.
Im sure Im going to have quite a few queries which you good folk will hopefully help with.
First up, Im looking at speccing / sourcing all my fittings as this I think will be the hardest element. A lot of my mast fittings are T bars, what have people found suitable for this?
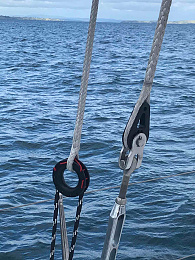
I did see the attached photo somewhere (cant find it again now!) but this looks undersized on the bend / rope diameter ratio & I could only find examples suitable for up to 8mm Dyneema. Im going to need my main shrouds to be 13mm
All suggestions are welcome
Richard. |
I used a threaded T ball fitting and threaded toggle fitting, left and right hand threads and got a threaded coupler nut machined to join them, sourced parts from Bluewave
|
|
|
|
|
30-10-2020, 14:27
|
#64
|
|
Registered User
Join Date: Jan 2011
Location: Geelong, Victoria, Australia
Boat: Hunter 40
Posts: 218
|
Re: Dyneema rigging on a budget
Quote:
Originally Posted by Nauticatarcher
I used a threaded T ball fitting and threaded toggle fitting, left and right hand threads and got a threaded coupler nut machined to join them, sourced parts from Bluewave |
I used threaded stem balls and toggles from SeaRig in NZ
__________________
Regards Craig
|
|
|
|
|
31-10-2020, 01:55
|
#65
|
|
Registered User
Join Date: Oct 2020
Location: Staffordshire UK
Boat: Bruce Roberts 43
Posts: 12
|
Re: Dyneema rigging on a budget
Quote:
Originally Posted by Nauticatarcher
I used a threaded T ball fitting and threaded toggle fitting, left and right hand threads and got a threaded coupler nut machined to join them, sourced parts from Bluewave
|
Sounds like a good idea.
Looking at your profile pic - did you stay with SS for your Forestay?
|
|
|
|
|
31-10-2020, 02:03
|
#66
|
|
Registered User
Join Date: Oct 2020
Location: Staffordshire UK
Boat: Bruce Roberts 43
Posts: 12
|
Re: Dyneema rigging on a budget
Quote:
Originally Posted by fxykty
|
Those Rope T eyes do look nice & also looks like a way to eliminate even more fittings & pins. Looks like they do one with a shaft size of 12.58mm, so would be pretty well 1:1 bend ratio with 13mm Dyneema.
I can't get your final attachment to open?
Cheers,
Richard.
|
|
|
|
|
31-10-2020, 02:07
|
#67
|
|
Registered User
Join Date: Oct 2020
Location: Staffordshire UK
Boat: Bruce Roberts 43
Posts: 12
|
Re: Dyneema rigging on a budget
Quote:
Originally Posted by Benz
There is a Dutch company making T-fittings in all sizes. Forget the name..."Blue wave"? Can't find them online, but I'll come back with their name when I find it. We splice dyneema directly to the bail for running backstays all the time. |
Thanks Ben,
Do you splice onto the balls for shrouds as well as running backstays?
Also, do you directly splice around the eyes, or use thimbles?
If you have any pictures, that would be great.
Richard.
|
|
|
|
|
31-10-2020, 16:42
|
#68
|
|
Marine Service Provider
Join Date: Dec 2010
Location: Little Compton, RI
Boat: Cape George 31
Posts: 3,008
|
Re: Dyneema rigging on a budget
Quote:
Originally Posted by Biggfell
Thanks Ben,
Do you splice onto the balls for shrouds as well as running backstays?
Also, do you directly splice around the eyes, or use thimbles?
If you have any pictures, that would be great.
Richard. |
I don't recall having made anything other than running backstays and removable solent stays, but we've always spliced right to the bail. If you want a greater bend radius, you can always splice around a thimble and then put a lashing between thimble and T-fitting bail. This is still less pats than having a mast tang with bolt, toggle with clevis pins, and swaged eye, and all sorts of cotter pins, as a wire shroud would have.
__________________
Ben
zartmancruising.com
|
|
|
|
|
01-11-2020, 02:45
|
#69
|
|
Registered User
Join Date: Oct 2020
Location: Staffordshire UK
Boat: Bruce Roberts 43
Posts: 12
|
Re: Dyneema rigging on a budget
Quote:
Originally Posted by Benz
I don't recall having made anything other than running backstays and removable solent stays, but we've always spliced right to the bail. If you want a greater bend radius, you can always splice around a thimble and then put a lashing between thimble and T-fitting bail. This is still less pats than having a mast tang with bolt, toggle with clevis pins, and swaged eye, and all sorts of cotter pins, as a wire shroud would have. |
Thanks Ben, think I'll buy a couple of T fittings and have a play. I can see then how my 13mm Dyneema sits in them and then decide on the final plan. It'll be mainly T Bar fittings that'll be holding the rig up, so want to get it right!
|
|
|
|
|
27-01-2021, 23:15
|
#70
|
|
Registered User
Join Date: Jan 2020
Posts: 13
|
Re: Dyneema rigging on a budget
Quote:
Originally Posted by fxykty
|
Hi FxyKty,
I've been following your comments with interest because I have made an offer on a Danson era Outremer 55 with aged rigging and I am planning on rerigging her with Dyneema.
I am also considering Colligo gear (though I have asked a CNC shop in S Africa to quote me on fabricating something similar). Did you consider closed thimbles up top simply pinned through the existing tangs on the rig as an alternative to the Cheeky Tangs?
Have you found any issues or thought of anything you'd do differently next time? I love your runner tackles btw! Simple, reliable, cheap and light!
Cheers,
Mike
|
|
|
|
|
28-01-2021, 10:03
|
#71
|
|
Registered User
Join Date: Apr 2016
Location: Indonesia
Boat: Outremer 55L
Posts: 3,810
|
Dyneema rigging on a budget
Quote:
Originally Posted by Insolent
Hi FxyKty,
I've been following your comments with interest because I have made an offer on a Danson era Outremer 55 with aged rigging and I am planning on rerigging her with Dyneema.
I am also considering Colligo gear (though I have asked a CNC shop in S Africa to quote me on fabricating something similar). Did you consider closed thimbles up top simply pinned through the existing tangs on the rig as an alternative to the Cheeky Tangs?
Have you found any issues or thought of anything you'd do differently next time? I love your runner tackles btw! Simple, reliable, cheap and light!
Cheers,
Mike |
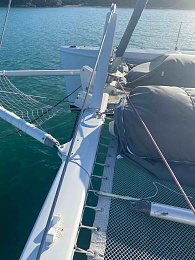
Hi Mike,
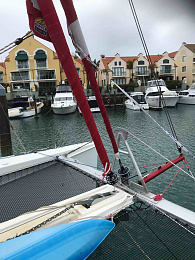
Out of an abundance of curiosity, which 55? Standard or Light? Im sure you wont be disappointed!!
We wanted to replace all the fittings as they were original and aged, hence why we decided on the Cheeky Tangs as the replacement, including through bolts (which are titanium and larger than the SS bolts they replaced). Also means fewer pieces. We reused (and enlarged) the existing tang bolt holes. Heres a photo after 6 months and plenty of hard winds and seas.
Using a solid thimble as the terminator with the existing tang is certainly an option, especially if you dont want to replace the tangs - we use a Colligo terminator at the lower end of the cap shroud to attach to the turnbuckle with a pin. Im not sure about using thimbles as others have pointed out since theres not much bearing surface with them due to the rounded profile.
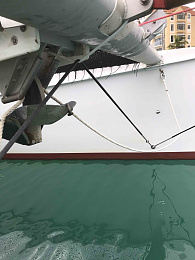
We did replace the original aluminium cap shroud chainplates as the eyes were showing signs of stretch. We had stainless steel chainplates cast in moulds made from the original chainplates, so larger than absolutely necessary in terms of strength. Alternatively weve heard of others who had them cut from stainless plate and bent to shape.
Our diamond and jumper stays were replaced when we got the boat so we left them alone. When it comes time to replace theyll remain SS wire as Im not convinced that fibre is correct in that application. We will replace the wire martingale stay with fibre when it comes time to replace that.
Check the main bulkhead very carefully, especially where it is connected to the main beam at the bottom of the cavity - if theres been any leakage from the mast wiring thats where there can be water damage. Weve re-routed the mast wiring out the side of the mast above the deck and completely sealed the mast base.
We also changed our forestay and took the opportunity to lengthen it slightly (back to the original sail plan specification - the one we replaced was about 100mm shorter for some reason). There is some lee helm when hard on the wind and this really helped. Our new main will be slightly shorter on the leech to compensate. We took the opportunity with the mast down to move the spinnaker block to the masthead. We havent added running backstays to the masthead as we dont run the spinnaker in strong winds and that section of mast is supporting the huge mainsail leech load upwind, but will likely add a pair of Cheeky Tangs the next time the mast is down.
No issues or plans to change anything when replacing. Since we wont have to replace the tangs nor chainplates it will be a much simpler and cheaper job, able to be done with the mast up.
|
|
|
|
|
28-01-2021, 16:37
|
#72
|
|
Registered User
Join Date: Jan 2020
Posts: 13
|
Re: Dyneema rigging on a budget
Thanks for the detailed reply. It's a Standard though I came pretty close to buying a Light in the US before COVID shut down that plan. We are planning on long term liveaboard cruising with a family of four.
Interesting about your forestay... that must have had a considerable affect on mast rake. No wonder you had lee helm! Did you stick with wire for the forestay or change to Dyneema? I know it can be done with certain furlers incl some Profurl models but it's a bit more complicated and I'm not sure I like the idea of not being able to easily inspect the dyneema inside the foil. I'd be very interested in seeing the original rig drawings if you have them. I have very little documentation on the boat.
The jumpers on this boat were also recently redone (in SS) and I agree that Dyneema is probably not suitable here.
A full hoist kite halyard is a good plan, might have to adopt that one!
I think with the existing two tang design where the shrouds attach to the rig there isn't much to be gained from the cheeky tangs over a conventional pin through a solid thimble, but I suppose if you were changing the whole lot anyway... A titanium through bolt is fancy!
Funny that you mention the bulkhead: I found this exact issue, though the surveyor didn't! Part of the longitudnal section of the mast support box was rotten from water sitting in there. Fortunately not the bulkhead itself. It's testament to the strength of the build that there was not even any crazing in the gelcoat around the mast base, so there has been no movement there.
I think I read in the original thread you referring to a staysail... have you rigged a staysail on your boat? This is something I'm investigating because I'm not a big fan of sailing with heavily reefed headsails. Terrible sail shape and terrible for the sail too. If you've come up with a way to rig a staysail I'd be very interested to hear it. My general idea would be a hanked on staysail on a removable inner forestay with a 'floating' tack point formed by a bridal from reinforced pad eyes fitted inboard on the hulls. The rig will of course need a hoist and appropriate reinforcement there too, possibly with two part runners.
Cheers,
Mike
|
|
|
|
|
28-01-2021, 17:28
|
#73
|
|
Registered User
Join Date: Aug 2011
Location: Petersburg, AK
Boat: Outremer 50S
Posts: 4,229
|
Re: Dyneema rigging on a budget
Insolent,
Fxykty may have more detailed information (he's been really tricking out his boat), but here are a couple of documents we got with ours.
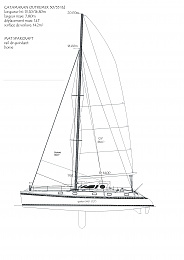 O55N21 sail plan.pdf
|
|
|
|
|
28-01-2021, 17:36
|
#74
|
|
Registered User
Join Date: Apr 2016
Location: Indonesia
Boat: Outremer 55L
Posts: 3,810
|
Re: Dyneema rigging on a budget
Quote:
Originally Posted by Insolent
Thanks for the detailed reply. It's a Standard though I came pretty close to buying a Light in the US before COVID shut down that plan. We are planning on long term liveaboard cruising with a family of four.
Interesting about your forestay... that must have had a considerable affect on mast rake. No wonder you had lee helm! Did you stick with wire for the forestay or change to Dyneema? I know it can be done with certain furlers incl some Profurl models but it's a bit more complicated and I'm not sure I like the idea of not being able to easily inspect the dyneema inside the foil. I'd be very interested in seeing the original rig drawings if you have them. I have very little documentation on the boat.
The jumpers on this boat were also recently redone (in SS) and I agree that Dyneema is probably not suitable here.
A full hoist kite halyard is a good plan, might have to adopt that one!
I think with the existing two tang design where the shrouds attach to the rig there isn't much to be gained from the cheeky tangs over a conventional pin through a solid thimble, but I suppose if you were changing the whole lot anyway... A titanium through bolt is fancy!
Funny that you mention the bulkhead: I found this exact issue, though the surveyor didn't! Part of the longitudnal section of the mast support box was rotten from water sitting in there. Fortunately not the bulkhead itself. It's testament to the strength of the build that there was not even any crazing in the gelcoat around the mast base, so there has been no movement there.
I think I read in the original thread you referring to a staysail... have you rigged a staysail on your boat? This is something I'm investigating because I'm not a big fan of sailing with heavily reefed headsails. Terrible sail shape and terrible for the sail too. If you've come up with a way to rig a staysail I'd be very interested to hear it. My general idea would be a hanked on staysail on a removable inner forestay with a 'floating' tack point formed by a bridal from reinforced pad eyes fitted inboard on the hulls. The rig will of course need a hoist and appropriate reinforcement there too, possibly with two part runners.
Cheers,
Mike |
Congrats on your Standard. Check out the blog Tika Travels http://www.tikatravels.com/ about a family with two tween kids who sailed from the Caribbean to West Australia on a 55S.
Forestay: We now have a Doyle Stratis cable, essentially non-braided SK99 fibre core (several thousand strands laid straight around the top and bottom thimbles, with several layers of braided covers). It is connected top and bottom with a KZ Racefurlers 10T top swivel and bottom single line furler. The furler components are connected directly to the respective tangs. We converted the original jib with soft hanks, but our new sail will have a zip luff sleeve. I wouldnt even consider putting a hard foil over top of a fibre forestay. Note that our jib is lashed into place and cannot be dropped without climbing the mast.
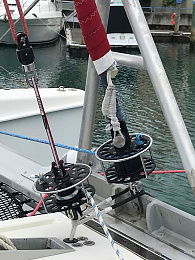
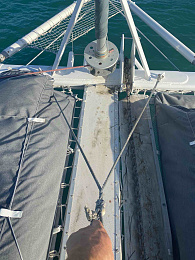
Inner forestay: We created a soft loop tack fitting, which is attached to the front beam and supported for vertical load with a Dyneema stay connected to the same hull pad eyes as used by the bow pole stays. The fitting is located about 250mm behind the forestay. A single line furler is connected to the soft loop. Our staysail is cable less - it is connected to the furler at the tack and to a Doyle Stratis extension cable that connects to the top swivel on the jib halyard, the top swivel gets hoisted to the top before unfurling the sail. The extension cable is there as the staysail luff is 2/3 the height of the halyard. The jib halyard was converted to 2:1 using the existing tang on the mast halfway between the jib halyard shelve and the upper tang for the front diamond spreader wire. We have a storm jib that has its own cable as it is so much shorter on the luff.
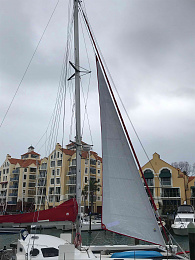
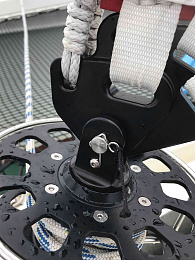
Close up of the tack fitting on the staysail
Ive seen another 55L (Zephyr - you can find them on Instagram) who connects his staysail tack to a three part fibre cable, 2 on the front beam and 1 to the windlass. Unlike us, Zephyr has a genoa and can attach a line in front of the mast, which would interfere with our self-tacking jib.
By using the jib halyard (there are two sheaves up there, so you could install a second halyard) the halyard load (which is effectively the inner forestay) is aligned with the hounds, cap shrouds and the existing running backstays - nothing new needed.
We reuse the existing self-tacking jibsheet and all three headsails are cut to use the same lead.
|
|
|
|
|
|
| Thread Tools |
Search this Thread |
|
|
|
| Display Modes |
Rate This Thread |
 Linear Mode Linear Mode
|
|
 Posting Rules
|
You may not post new threads
You may not post replies
You may not post attachments
You may not edit your posts
HTML code is Off
|
|
|
|
Advertise Here

 Recent Discussions Recent Discussions |
|
|
|
|
|
|
|
|
|
|
|
|
|
|
|
|
|
|
|
|
|
|
|
|
|
Vendor Spotlight |
|
|
|
|
|
|
|
|
|


