 |
|
 15-03-2017, 15:16
|
#166
|
|
Moderator


Join Date: Oct 2008
Boat: Bestevaer 49
Posts: 16,151
|
Re: Comparing techniques used for eye splicing double braid polyester (=Class 1)
Quote:
Originally Posted by s/v Jedi

The last ones I made were still with the diamond knot. I now have 650' (!) of Amsteel Blue coming, bags full of low friction rings, Antal clutches etc. so will be doing a lot of rope work in the months ahead. I think I will try the big overhand shackle this time for two reasons: I can do the eye splices very quick and I now have one of those miracle Dyneema scissors coming so expect to do them even quicker. Second reason is that I really like how the buried tails of the two eye splices goes all the way through the stopper knot, into the legs of the shackle without interruption. The button-knot method starts the bury right under the knot so that it a weak point, right where the noose goes around to load it up and possibly crush fibers on the ridge where the tails start the bury.
I'm still thinking about toggles, how to keep low friction rings up from deck etc. I'll be making boom vangs with those  |
The failure with the Button soft shackles is not at the stopper, it is at the noose, as it is with the Overhand soft shackles, so it matters not that the legs don't bury all the way into the stopper.
Try the overhand and see how you like it. It is effective (as long as you keep the loops of the eye splices as small as possible.), giving the same system strength as the soft shackles with Buttons that have buried legs, but it is clunky and not so easy on the eye.
There were a couple of long threads here last year on how to secure low friction rings. Check them out for ideas.
SWL
__________________
SWL (enthusiastic amateur)
"To me the simple act of tying a knot is an adventure in unlimited space." Clifford Ashley
"The cure for anything is salt water: sweat, tears or the sea." Isak Dinesen
Unveiling Bullseye strops for low friction rings
|

|

|
|
15-03-2017, 20:20
|
#167
|
|
Registered User
Join Date: Mar 2014
Location: Moreton Bay
Boat: US$4,550 of lead under a GRP hull with cutter rig
Posts: 2,138
|
Re: Comparing techniques used for eye splicing double braid polyester (=Class 1)
Quote:
Originally Posted by Seaworthy Lass
This comment was made in response to Juho's consideration of what an extreme splice would be like (a super thin one with no core in the loop and both core and cover tails well tapered):
I am rewatching the videos to check the data we are collecting and I came across this interesting snippet from Premium Ropes when the little arrow is clicked at the bottom of their June 2016 video (May 2016 in Dutch). I hadn't picked it up before, as I was looking at the Dutch version:
"A core-dependent rope (polyester or nylon core) takes approximately 30% of its breaking strength out of its cover".
Therefore 70% is from its core.
If this is correct, then it is critical that core is well secured in the loop of the splice. A loop of cover alone will not provide line strength, even when new. |
I think for core-dependent (Class II, with a high modulus core) double braid the core carries more than 70%.
'Standard', or 'balanced', or Class I double braid, such as polyester braid on polyester braid, the core usually carried 60 - 70% of the load. But it is complicated by whether we are talking transient load, steady load, cyclical load etc ...
The ropemaker effectively chooses the separate contributions to rope strength from cover and core. The ropemaker chooses:
1. the price point (which influences how much polyester fibre goes into the rope). Polyester fibre gives strength, not the air caught in between the braid. The price point has to be justified to the market, so that means higher priced rope usually has higher breaking strength (and hence working loads are higher because we generally want to work rope at only 20% of breaking strength) and lower elongation (for yacht braid; mountain climbers like strength and higher elongation). The price point then helps determine the next few parameters:
2. the pitch distance of cover and the core. If you have a rope with a single coloured tracer thread, measure the distance of the repeat of that thread. That's the pitch point. Cores almost never have a tracer thread, so you have to follow one thread for yourself. A longer pitch in the core means lower elongation of the rope and higher strength. A shorter pitch in the cover means less liability to snag, lower abrasion, good coverage and protection of the core, and so on. The longer pitch in the core means that as tension is applied to the rope, the core takes the load before the cover. Only when the load is more than a transient peak in cycling force and greater than some threshold does the cover play a big part.
*** so, as SWL noted above, if you do a poor splice in double braid, such as by shortening your core too much and starving the eye loop of core (and creating a hollow), expect that your rope strength has been compromised.
That different pitch also relates to the different ability of the core and cover to stretch and shrink. As the core takes the immediate transient tension, it shrinks in diameter. The shorter pick cover has the ability to shrink (when its removed from the core) and also to elongate. So as the core stretches in length and shrinks in diameter under the initial transient tension, the cover has to 'catch up' by stretching mechanically. That slows down further the contribution to sharing the load by the cover.
The result is that the relative load core/cover changes with time of the load. That does not show up much in simple breaking strength tests. It shows up in cyclical tests.
3. the relative lineal mass of core versus cover. More fibre mass (grams/meter) in the core compared to in the cover means the core contributes more to strength and more to lower elongation. Once the ropemaker has chosen the price point (and how many grams of polyester to put in each meter), then she allocates polyester to core and cover. So 55% of the mass might go into the core and only 45% in the cover (that split apparently gives optimum strength; increasing the core past 55% has a tiny return; a 50-50 split of mass between core and cover usually, in general weasel words, means the core carries about 60% of the load and the cover 40%.)
** The point of that is that statement by Premium Rope is probably really about a Class I/balanced/standard double braid rope with about 55% of the polyester in the core.
** I reckon some of the inexpensive stuff sold as generic double braid by my local chain of marine supply stores is more likely 50-50 core-cover (if the manufacturer does not give specs for elongation, working load, and ultimate breaking strength, and if you think you've found bargain rope, then I think it's safe to assume you've found cheap rope - in all senses of that word 'cheap' and that it will elongate more than you will expect. Unbranded rope is cheap. The retailer makes a profit. And perhaps the ropemaker did not brand it because she is not proud of it).
4. the number of strands. Braiding machines have a particular number of carriers into which the strands feed. A cover braider might have 8, 16, or 32 carriers, each carrying 2, 3, or 4 fibre bundles or strands. And thus deliver a 32 strand rope (we get into terminological muddles here between strands and yarns: if you have a 32 strand rope, you can say it was made from 8 bundles each of 4 strands or you can call the bundles strands and the individual things yarns) or 24 strands (8 bundles of 3) etc.
Small diameter (yacht braid) cover usually comes from an 8 or 16 carrier braider. Bigger diameter rope (above 64 mm diameter,such as used on mega-yachts and cargo ships) might use 32 carriers (so with 2 strands a carrier, 64 strands in total).
More strands in the cover means it does a better job of covering the core because it shrinks and elongates more. More flexibility and firmness and better resist abrasion and snags. And cost more to make, because the braider with more carriers has to earn its keep.
More strands in the core, 12 instead of 6, at a long pitch mean lower elongation and higher strength.
__________________
Fools say that you can only gain experience at your own expense, but I have always contrived to gain my experience at the expense of others. - Otto von Bismarck
|
|
|
|
|
15-03-2017, 20:50
|
#168
|
|
always in motion is the future
Join Date: Feb 2009
Location: in paradise
Boat: Sundeer 64
Posts: 18,951
|
Re: Comparing techniques used for eye splicing double braid polyester (=Class 1)
Quote:
Originally Posted by Seaworthy Lass
The failure with the Button soft shackles is not at the stopper, it is at the noose, as it is with the Overhand soft shackles, so it matters not that the legs don't bury all the way into the stopper.
Try the overhand and see how you like it. It is effective (as long as you keep the loops of the eye splices as small as possible.), giving the same system strength as the soft shackles with Buttons that have buried legs, but it is clunky and not so easy on the eye.
There were a couple of long threads here last year on how to secure low friction rings. Check them out for ideas.
SWL
|
Let me try to word it differently: the noose goes around the body of the shackle just below the stopper knot. For the Overhand shackle, that area is undisturbed two legs with tails buried. This is a smooth anchor for the noose. For the Button shackle, the tails enter the two legs right there under the stopper knot. This is not a smooth, undisturbed area and when the noose goes around this, some of it's fibers can get pinched or crushed from tension against where the bury starts.
The failure point would still be the noose, but the noose on the Overhand should withstand more load because of this, and test data seems to confirm this.
I read the threads on the low friction rings but saw no solutions for keeping them from flogging the deck...
|
|
|
|
|
15-03-2017, 21:02
|
#169
|
|
always in motion is the future
Join Date: Feb 2009
Location: in paradise
Boat: Sundeer 64
Posts: 18,951
|
Re: Comparing techniques used for eye splicing double braid polyester (=Class 1)
I've been reading a lot today and found the following:
- balance between core and cover; take a short piece of the rope you use and take the core out. Weigh the core and compare with the weight of the cover. If both are the same, you can count on a 50/50 balance.
- strength of core/cover; if core and cover weigh the same and the rope is rated for 1,000lb then you expect the core to take 500lb and the cover as well. However, when tested separately, each will test around 750-800lb. This means that when combined into the double braid rope, strength is lost. This is normal for any kind of rope construction, but it means that a cover-only eye as well as a core-only eye is 150% instead of just 100%.
- core is stronger; in light of the above points, the core tests a little stronger than the cover. This is because the fibers in the core are much more parallel than those of the cover, i.e. the cover fibers bend more. This adds qualities other than strength.
- aging: core ages almost as much as the cover. lots of UV penetrates through the cover into the core.
- a spliced line breaks just before the splice because the first extra fiber buried in the standing part of the line cause a stress riser which leads to the failure. If it breaks elsewhere, like in the splice, then a mistake was made during the splice, or it has become damaged/worn is some way. The splice would be much stronger than other parts of the line.
all this from Evans/Brion/Allan and others' posts.

|
|
|
|
|
15-03-2017, 23:55
|
#170
|
|
Moderator
Join Date: Oct 2008
Boat: Bestevaer 49
Posts: 16,151
|
Re: Comparing techniques used for eye splicing double braid polyester (=Class 1)
Quote:
Originally Posted by Juho
The Gleistein method is complex since it extracts core twice. But on the other hand the measurements are quite easy. Many were just approximate, but the splice is still accurately measured.
The shrinking of the rope does not influence the measurements much. The buried segment is buried inside both core and cover, which means that cover and core are expected to shrink about as much, and therefore P' will stay in the finished splice pretty much where it was marked. From this point of view the structure and measurements are simple.
One more benefit might be that the size and type of the rope doesn't influence the measurements much.
He used hydraulics for final milking. I hope it is doable also by hands.  |
The only thing I don't like about it is that (as you mentioned earlier) the final bury of core and cover are in one direction.
Quote:
Originally Posted by Juho
Edit: I think the end of the core needs to be placed quite accurately to get the correct loop size (without any cover / core misbalance).
|
I think that would be easy with a bit of care. Before you did anything, you would mark the point the loop started and part the strands and mark the core. Having a marker like this at the start would show you exactly where you needed to start the final bury (maybe a couple of rope diameters closer to the standing end from this?).
Apart from the very short distance between the crossover point inside and the base of the loop, the cover and matching core would be stretching roughly an equal amount, so minimal allowance needs to be made for any discrepancy.
It may be hard getting everything aligned back to this point after pulling out masses of core - that would depend on the type of rope used and the care the user takes.
SWL
__________________
SWL (enthusiastic amateur)
"To me the simple act of tying a knot is an adventure in unlimited space." Clifford Ashley
"The cure for anything is salt water: sweat, tears or the sea." Isak Dinesen
Unveiling Bullseye strops for low friction rings
|
|
|
|
|
16-03-2017, 00:04
|
#171
|
|
Moderator
Join Date: Oct 2008
Boat: Bestevaer 49
Posts: 16,151
|
Re: Comparing techniques used for eye splicing double braid polyester (=Class 1)
Quote:
Originally Posted by s/v Jedi
Let me try to word it differently: the noose goes around the body of the shackle just below the stopper knot. For the Overhand shackle, that area is undisturbed two legs with tails buried. This is a smooth anchor for the noose. For the Button shackle, the tails enter the two legs right there under the stopper knot. This is not a smooth, undisturbed area and when the noose goes around this, some of it's fibers can get pinched or crushed from tension against where the bury starts.
The failure point would still be the noose, but the noose on the Overhand should withstand more load because of this, and test data seems to confirm this. |
Got it .
I misunderstood. You are concerned about the noose rubbing under the base of the stopper.
Evans load testing did not show that the Overhand stopper gave higher strength though, so I don't think that is much of a concern. What test data are you referring to?
The Overhand is an easy stopper for anyone wanting one of the higher strength shackles. With a bit of patience the Button can be learned though, and apart from its beauty it is just super satisfying to tie. You start with an impossible looking mess and as if by magic a gorgeous stopper emerges. Like a butterfly from a cocoon  .
I think it is well worth learning to make Brion Toss's Button. Ultimately the difference in time taken is a minute or two. It's no big deal.
SWL
__________________
SWL (enthusiastic amateur)
"To me the simple act of tying a knot is an adventure in unlimited space." Clifford Ashley
"The cure for anything is salt water: sweat, tears or the sea." Isak Dinesen
Unveiling Bullseye strops for low friction rings
|
|
|
|
|
16-03-2017, 00:10
|
#172
|
|
Moderator
Join Date: Oct 2008
Boat: Bestevaer 49
Posts: 16,151
|
Re: Comparing techniques used for eye splicing double braid polyester (=Class 1)
Quote:
Originally Posted by s/v Jedi
I read the threads on the low friction rings but saw no solutions for keeping them from flogging the deck...
|
I think it was a member here called CruisingScott who showed a leather sheath. Because he was doubling up the loop going around the LF ring, it was shorter. The leather could be continued further down, creating a short stiff structure that would not flop down. You would need to experiment.
These early days learning what to do with dyneema and LF rings are an exciting time .
SWL
__________________
SWL (enthusiastic amateur)
"To me the simple act of tying a knot is an adventure in unlimited space." Clifford Ashley
"The cure for anything is salt water: sweat, tears or the sea." Isak Dinesen
Unveiling Bullseye strops for low friction rings
|
|
|
|
|
16-03-2017, 06:14
|
#173
|
|
always in motion is the future
Join Date: Feb 2009
Location: in paradise
Boat: Sundeer 64
Posts: 18,951
|
Re: Comparing techniques used for eye splicing double braid polyester (=Class 1)
Quote:
Originally Posted by Seaworthy Lass
Got it .
I misunderstood. You are concerned about the noose rubbing under the base of the stopper.
Evans load testing did not show that the Overhand stopper gave higher strength though, so I don't think that is much of a concern. What test data are you referring to?
The Overhand is an easy stopper for anyone wanting one of the higher strength shackles. With a bit of patience the Button can be learned though, and apart from its beauty it is just super satisfying to tie. You start with an impossible looking mess and as if by magic a gorgeous stopper emerges. Like a butterfly from a cocoon .
I think it is well worth learning to make Brion Toss's Button. Ultimately the difference in time taken is a minute or two. It's no big deal.
SWL |
Here is that test: A comparison of Soft Shackle methods | Slack Science
Check the results table at the end. The weak sample of the Overhand shackle was caused by the knot inverting because they spliced the eyes too big. For the "weak" samples of the Button shackles, I'm sure that they didn't tie the knot 100%, didn't tighten it enough etc. but this is much harder to prevent than splicing the right size eyes.
I like the art that is in seamanship; the diamond knot is pretty as well. But I take functionality and repeatability over art in this case. Plus, being an engineer, I see the art in the methods and techniques that eliminate possible problems by better design, as well as increasing repeatability by a method of simple measuring and accurately marking instead of mastering a complex knot. With the Diamond knot shackles, I tied 10x as much diamond knots to practice them than for actual shackles. Not that I hate that, but it is the reason most sailors buy them instead of making their own.
|
|
|
|
|
16-03-2017, 14:15
|
#174
|
|
Moderator
Join Date: Oct 2008
Boat: Bestevaer 49
Posts: 16,151
|
Re: Comparing techniques used for eye splicing double braid polyester (=Class 1)
Quote:
Originally Posted by s/v Jedi
Quote:
Originally Posted by Seaworthy Lass
Evans load testing did not show that the Overhand stopper gave higher strength though, so I don't think that is much of a concern. What test data are you referring to?
|
Here is that test: A comparison of Soft Shackle methods | Slack Science
Check the results table at the end. The weak sample of the Overhand shackle was caused by the knot inverting because they spliced the eyes too big. For the "weak" samples of the Button shackles, I'm sure that they didn't tie the knot 100%, didn't tighten it enough etc. but this is much harder to prevent than splicing the right size eyes. |
Statistically there is no significant difference between these results. That study does not show the Overhand stopper soft shackle is stronger than the one using the Button stopper.
Quote:
Originally Posted by s/v Jedi
I like the art that is in seamanship; the diamond knot is pretty as well. But I take functionality and repeatability over art in this case.
|
Functionality is better with the Button as well. It is a neat, easy to handle size. The Overhand is huge and clunky. Given its size it is harder to secure and undo and it creates greater windage for those racing.
Quote:
Originally Posted by s/v Jedi
Plus, being an engineer, I see the art in the methods and techniques that eliminate possible problems by better design, as well as increasing repeatability by a method of simple measuring and accurately marking instead of mastering a complex knot. With the Diamond knot shackles, I tied 10x as much diamond knots to practice them than for actual shackles. Not that I hate that, but it is the reason most sailors buy them instead of making their own.
|
The Overhand could fail if care is not taken. The eyes of the 2 loops need to be as small as possible or the knot could collapse. A recent video I watched did not warn of that. If fact, there was no mention of making these eyes small. Lots of room for error there.
The Button poses no such problems. You instantly know if you have "got it right" as the stopper is beautifully symmetrical when you have tied it correctly. Far less chance of error in that regard.
Can you tell I am a fan?
SWL
__________________
SWL (enthusiastic amateur)
"To me the simple act of tying a knot is an adventure in unlimited space." Clifford Ashley
"The cure for anything is salt water: sweat, tears or the sea." Isak Dinesen
Unveiling Bullseye strops for low friction rings
|
|
|
|
|
16-03-2017, 15:38
|
#175
|
|
always in motion is the future
Join Date: Feb 2009
Location: in paradise
Boat: Sundeer 64
Posts: 18,951
|
Re: Comparing techniques used for eye splicing double braid polyester (=Class 1)
Quote:
Originally Posted by Seaworthy Lass
Statistically there is no significant difference between these results. That study does not show the Overhand stopper soft shackle is stronger than the one using the Button stopper.
Functionality is better with the Button as well. It is a neat, easy to handle size. The Overhand is huge and clunky. Given its size it is harder to secure and undo and it creates greater windage for those racing.
The Overhand could fail if care is not taken. The eyes of the 2 loops need to be as small as possible or the knot could collapse. A recent video I watched did not warn of that. If fact, there was no mention of making these eyes small. Lots of room for error there.
The Button poses no such problems. You instantly know if you have "got it right" as the stopper is beautifully symmetrical when you have tied it correctly. Far less chance of error in that regard.
Can you tell I am a fan?
SWL |
I can :-) However, the table with test results does not support your position: there are wild variations in the strength of the Button knot shackle as well and that must have to do with how the knot is tied.
For the Overhand knot shackle, I agree that the eye splices must be an exact small size, but like I wrote before: you can measure and mark that accurately over and over again. You must have looked at the overhand knot before it got tightened under load. It is not as big as you make it
I will make both of-course and post everything about it.
For now we're varnishing and painting Awlgrip. I tried to skip the Awlgrip primer but that didn't work out like I had hoped... it's easier to just use the primer and now I have to do that extra coat anyway... but I had to try
My order of rope and related hardware is expected to arrive April 5th and I'm pretty ready for it with my research and preparations. I'm gonna make main and mizzen halyards out of 1/4" Amsteel Blue, with about half of that covered with Yale 3/8" dacron cover. Also I have XLS Yachtbraid for a second set of halyards/topping lifts so that's the braid on braid splices. Then new jacklines, new halyard for the stay jib etc. Gonna be doing a lot of splicing :-)
|
|
|
|
|
17-03-2017, 02:45
|
#176
|
|
Moderator
Join Date: Oct 2008
Boat: Bestevaer 49
Posts: 16,151
|
Re: Comparing techniques used for eye splicing double braid polyester (=Class 1)
Quote:
Originally Posted by s/v Jedi
I can :-) However, the table with test results does not support your position: there are wild variations in the strength of the Button knot shackle as well and that must have to do with how the knot is tied.
|
I haven't done any statistical analysis for decades, but looking at the spread of data in that table, there will not be any significant difference between average system strengths of 224% and 228% of line strength that have been listed for the two types of soft shackles.
I think the "wild variations" found are due to both types of stoppers not being well tightened before being subjected to sudden, high load. The loading on the two legs is different then, weakening the system dramatically. None of the soft shackles snapped at the stoppers for either the Button or Overhand. It was at the noose or along the legs. Along the legs signals to me that the stoppers were very loose and load must have been applied fairly suddenly for the legs not to equalise in length (they are both Kohloff style with seperate legs for the main body), so had the load equalised, they would have broken at the noose, which is weaker than a leg as it bends sharply. You see this type of break with badly made soft shackles where the central portion is buried and locked into that buried position. Something must have been really weird with the construction of the Overhand stoppers in that test - three of the five broke along a leg! None of the soft shackles with Button stoppers did.
Evans Starzinger advised tightening up the stoppers as well as possible by hand, then subjecting them slowly to load and leaving them to sit for a while. I doubt very much they did that in the Balance study you are referring to. That is probably why they found such a spread of results.
Quote:
Originally Posted by s/v Jedi
You must have looked at the overhand knot before it got tightened under load. It is not as big as you make it |
I may have exaggerated a smidge about just how huge it is, but it is big and clunky .
I am a fan of pretightening soft shackles after Evans strongly advised doing this before applying any sudden load, so all the Overhand ones I have tied have been tightened well. I am not unfamiliar with them. I simply don't like handling the bulk of an Overhand stopper. YMMV.
I played with the Overhand stopper last year specifically to see if it could be used in a Bullseye soft shackle (I wanted to increase potential strength form 170% to 230%. It was left for half an hour subjected to the maximum load I could winch so I think it ended up "tightened" .
Photobucket is down at the moment, so I will load the photos later.
Quote:
Originally Posted by s/v Jedi
I will make both of-course and post everything about it.
|
That will be fantastic!
Thank you. I know all this takes time, but it furthers our knowledge. We are in such early stages of working with dyneema and soft shackles (and LF rings) and learning in leaps and bounds.
SWL
__________________
SWL (enthusiastic amateur)
"To me the simple act of tying a knot is an adventure in unlimited space." Clifford Ashley
"The cure for anything is salt water: sweat, tears or the sea." Isak Dinesen
Unveiling Bullseye strops for low friction rings
|
|
|
|
|
17-03-2017, 17:59
|
#177
|
|
always in motion is the future
Join Date: Feb 2009
Location: in paradise
Boat: Sundeer 64
Posts: 18,951
|
Re: Comparing techniques used for eye splicing double braid polyester (=Class 1)
That's the problem with averages... they don't show the variation.
Okay, let's look at that button knot shackle again:
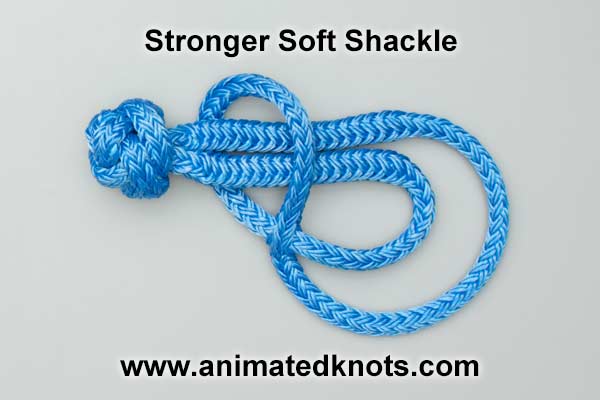
Now look at that position just under the stopper knot, where the noose will sit when the shackle is closed: thinner section! Now, compare to the big overhand:

Nice and thick section there. This is why I think it's better
I have been thinking... what about doing the button knot shackle but starting the bury 0.5" beyond the knot so that the noose sits around 4 individual rope diameters?
|
|
|
|
|
17-03-2017, 22:52
|
#178
|
|
Moderator
Join Date: Oct 2008
Boat: Bestevaer 49
Posts: 16,151
|
Re: Comparing techniques used for eye splicing double braid polyester (=Class 1)
Quote:
Originally Posted by s/v Jedi
That's the problem with averages... they don't show the variation.
Okay, let's look at that button knot shackle again:
Now look at that position just under the stopper knot, where the noose will sit when the shackle is closed: thinner section! Now, compare to the big overhand:
Nice and thick section there. This is why I think it's better
I have been thinking... what about doing the button knot shackle but starting the bury 0.5" beyond the knot so that the noose sits around 4 individual rope diameters? |
Hi Jedi
Both the Button and Overhand soft shackles have 4 legs emerging/entering the stopper itself. With the Button though, the tails don't bury until after the stopper is completed. I agree having them in the stopper, as in the Overhand, is a nicer notion. Love is not totally blind .
In practice, for the Button design, the noose does end up going around 4 individual legs, as it is impossible to start the bury of the tails absolutely jammed up against the base of the Button (although now that I have a splicing needle I should be able to get closer). You don't need to start the bury a bit beyond to achieve this.
The bury of the Button's tails is one bit I can't work out the dynamics of. The legs apparently need to be buried about 30x line diameter (strength is reduced with a shorter bury), with the bury starting preferably as close as possible to the base of the Button. The tails need to be buried after being pre-tensioned so that you can even out the tension and make the bury start close. So the legs clearly need to be gripped, as in a splice.
SWL
__________________
SWL (enthusiastic amateur)
"To me the simple act of tying a knot is an adventure in unlimited space." Clifford Ashley
"The cure for anything is salt water: sweat, tears or the sea." Isak Dinesen
Unveiling Bullseye strops for low friction rings
|
|
|
|
|
18-03-2017, 08:47
|
#179
|
|
always in motion is the future
Join Date: Feb 2009
Location: in paradise
Boat: Sundeer 64
Posts: 18,951
|
Re: Comparing techniques used for eye splicing double braid polyester (=Class 1)
Quote:
Originally Posted by Seaworthy Lass
Hi Jedi
Both the Button and Overhand soft shackles have 4 legs emerging/entering the stopper itself. With the Button though, the tails don't bury until after the stopper is completed. I agree having them in the stopper, as in the Overhand, is a nicer notion. Love is not totally blind .
In practice, for the Button design, the noose does end up going around 4 individual legs, as it is impossible to start the bury of the tails absolutely jammed up against the base of the Button (although now that I have a splicing needle I should be able to get closer). You don't need to start the bury a bit beyond to achieve this.
The bury of the Button's tails is one bit I can't work out the dynamics of. The legs apparently need to be buried about 30x line diameter (strength is reduced with a shorter bury), with the bury starting preferably as close as possible to the base of the Button. The tails need to be buried after being pre-tensioned so that you can even out the tension and make the bury start close. So the legs clearly need to be gripped, as in a splice.
SWL |
One of the first things I'll try is measuring the circumference of four individual rope diameters vs that of two buried in the other two. Even with my math background, I just get tired of thinking about calculating it
|
|
|
|
|
18-03-2017, 10:29
|
#180
|
|
Moderator
Join Date: Oct 2008
Boat: Bestevaer 49
Posts: 16,151
|
Re: Comparing techniques used for eye splicing double braid polyester (=Class 1)
Quote:
Originally Posted by s/v Jedi
One of the first things I'll try is measuring the circumference of four individual rope diameters vs that of two buried in the other two. Even with my math background, I just get tired of thinking about calculating it |
I think I know where this is heading .
If the bend ratio (sheave diameter to rope diameter) increases, system strength increases.
So you would like to know the difference in "sheave diameter" when the legs are buried compared to loose. Is this correct?
This is complicated. My thoughts are that if the hollow interior of the single braid is large enough to accomodate another lot of single braid, then I think if the legs are squished evenly by a noose it makes no difference if they are buried or not. What makes it complicated is that the compression will not occur evenly.
Also, the hollow interior is actually not large enough to accomodate another lot of single braid. The rope needs to shorten to allow the interior diameter to increase. This increases the thickness of the outer braid, so theoretically the sheave diameter increases. This would theoretically mean a higher efficiency.
If so, and compression is even, a perfectly made shackle with an Overhand stopper compared to a Button stopper would be a bit higher.
My loyalty to the Button is not diminished though (true love never dies ). I think any tiny increase in sheath diameter would make a miniscule difference in a system where the skill of the maker makes a big difference.
The principle behind making a stopper with 4 legs at its base was to increase sheath diameter and therefore increase system strength. It worked big time. I wonder if it possible to make this even greater?
What if we make a stopper where the base is more than 4 legs in size? Tricky, as we only have 2 legs going in, but nothing is impossible (eternal optimist here ). I wonder what stoppers we have at our disposal. Ashley has what looks like dozens of buttons (slight exaggeration ).
SWL
__________________
SWL (enthusiastic amateur)
"To me the simple act of tying a knot is an adventure in unlimited space." Clifford Ashley
"The cure for anything is salt water: sweat, tears or the sea." Isak Dinesen
Unveiling Bullseye strops for low friction rings
|
|
|
|
|
|
| Thread Tools |
Search this Thread |
|
|
|
| Display Modes |
Rate This Thread |
 Linear Mode Linear Mode
|
|
 Posting Rules
|
You may not post new threads
You may not post replies
You may not post attachments
You may not edit your posts
HTML code is Off
|
|
|
|
Advertise Here

 Recent Discussions Recent Discussions |
|
|
|
|
|
|
|
|
|
|
|
|
|
|
|
|
|
|
|
|
|
|
|
|
|
Vendor Spotlight |
|
|
|
|
|
|
|
|
|


