 |
|
 09-12-2013, 11:29
|
#16
|
|
Registered User

Join Date: Jun 2009
Location: In transit ( Texas to wherever the wind blows us)
Boat: Pacific Seacraft a Crealock 34
Posts: 4,115
|
Re: Endura Braid Classic, splice
 I'm almost done, couldn't wait I love splicing.
Tapering after the bury is a great idea, since I burn the cuts I can hear it catch slightly now and then as I pull to bury, not bad, but still don't like that.
I did taper down to 6, I kept the braid intact. But I was surprised at the obvious edge at end of the bury, not bad, but my core to core felt better.
do you go with a longer taper since you go down to one strand?
I'm half way through the lock stitch, stopped for lunch with my hubby.
Anyways, thanks so much for the help and advice, I'll be doing a bunch of splicing over the next 6months getting the boat ready to go cruising.
|

|

|
|
09-12-2013, 12:26
|
#17
|
|
Registered User
Join Date: Nov 2005
Location: Tasmania
Boat: VandeStadt IOR 40' - Insatiable
Posts: 2,317
|
Re: Endura Braid Classic, splice
Don't burn the cuts on your taper.
|
|
|
|
|
09-12-2013, 12:58
|
#18
|
|
Marine Service Provider
Join Date: May 2012
Location: New Orleans
Boat: We have a problem... A serious addiction issue.
Posts: 3,974
|
Re: Endura Braid Classic, splice
Ocean,
I do a slightly longer total bury than recommended (I think). I gave up on fid lengths and just work in diameter. So an amsteel splice is 72x the diameter of the line regardless of the size. Fid lengths make my head hurt since the size of the fids change with every size line, and I don't have any idea what the fid size is for 10mm line anyway, but I know a 10mm line needs a 720mm bury.
Think of it like this, the strength of the line stops where the first taper begins, so everything after the first taper cut is meaningless to the strength of the line. All this section does is provide a smooth transition from the single line to the double line, and the goal is to make the process as painless as possible. The fewer stress risers the better.
The best way to do this is to have a long taper, with as many small steps as possible. On bigger line, say 1/4" or larger, I make 12 cuts and try to make those cuts on a bias not at 90 degrees to the line. On smaller stuff I still try to taper down one strand at a time, but on the really small stuff (1mm) this gets very difficult. So I just do the best I can.
As Weyalan mentioned don't burn anything. If it's done properly dyneema splices with no fuzz anyway, and the hard spots from the melted line create stress risers... Which is the very thing we are trying to prevent.
For the lock stitching:
I prefer to use dyneema fishing line or dyneema whipping twine http://store.hamiltonmarine.com/brow...FU5o7AodvGQATg but Dacron stuff is ok as well.
Invest in a palm pusher from WM to help out, but buy needles from a fabric store. The stainless ones at boating stores are ridiculously overpriced. I keep a small tube of Chibi needles from JoAnn's in my splicing kit. Instead of the $15/ from WM the cheap ones are about .50.
__________________
Greg
- If animals weren't meant to be eaten then they wouldn't be made of food.
|
|
|
|
|
09-12-2013, 14:18
|
#19
|
|
Registered User
Join Date: Jun 2009
Location: In transit ( Texas to wherever the wind blows us)
Boat: Pacific Seacraft a Crealock 34
Posts: 4,115
|
Re: Endura Braid Classic, splice
Yes, I see now burning is unnecessary inside a splice. I made clean cuts, so not a lot of crusty threads  .
Bury length, 3 1/2 is 72x for my line, I saw that on Grogs. I read somewhere what size the lock stitch thread should be, size of individual strand I think, but now cannot find where I read it.
After the lock stitch I pulled the UV cover tight, trimmed to eye, then whipped base of eye with a quick stitch to keep the cover in place.
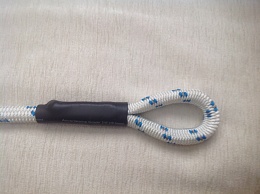
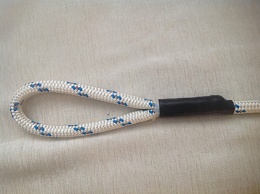
To all the newbies out there, as soon as you milk the taper to the proper eye size, throw a temporary stitch or tape so the eye is secure until you get the lock stitches in. It was surprising how easy the bury slipped. You can see my mark in the pic, not supposed to be showing, that's how far it slid in just a few minutes of handling.
It is not the prettiest set of splices but will do for my snubber. Really makes me appreciate the beautiful clean splices I see here on CF.
|
|
|
|
|
09-12-2013, 14:58
|
#20
|
|
Registered User
Join Date: Nov 2005
Location: Tasmania
Boat: VandeStadt IOR 40' - Insatiable
Posts: 2,317
|
Re: Endura Braid Classic, splice
Quote:
Originally Posted by Ocean Girl

It is not the prettiest set of splices but will do for my snubber. Really makes me appreciate the beautiful clean splices I see here on CF.
|
It looks plenty tidy enough to me. And at least you are having a go yourself, and saving yourself plenty of money too. I'm currently augmenting the cruising kitty by roughly $50 (sometimes $100) per week doing splices for people who won't do them themselves.
|
|
|
|
|
09-12-2013, 15:34
|
#21
|
|
Registered User
Join Date: Jun 2009
Location: In transit ( Texas to wherever the wind blows us)
Boat: Pacific Seacraft a Crealock 34
Posts: 4,115
|
Re: Endura Braid Classic, splice
Thanks! I really like working with line. Hopefully I can also get good enough to help the cruising kitty .
|
|
|
|
|
09-12-2013, 16:18
|
#22
|
|
Registered User
Join Date: Apr 2008
Location: U.S., Northeast
Boat: Currently boatless
Posts: 1,643
|
Re: Endura Braid Classic, splice
Quote:
Originally Posted by Ocean Girl
Thank you all for the great advice and info. I'll go with the long bury with stitch.
Ziggy, you are so right about the dyneema, no stretch ( <.6% I think). I'm following Estarzinger's snubber version. I like the idea because it is very chafe resistant, strong, and with little stretch on boat end, it cuts the noisy creaking of the snubber(we sleep right below the bow cleats). |
You're right, that looks very good.
__________________
... He knows the chart is not the sea.
-- Philip Booth, Chart 1203
|
|
|
|
|
10-12-2013, 08:38
|
#23
|
|
Senior Cruiser

Join Date: Aug 2009
Posts: 4,033
|
Re: Endura Braid Classic, splice
Just for practice I did a DB spectra splice . . . here is the covered version:
By the way, for things like sewing the cover down, I like to use waxed dental floss - strong and slippery. I use 80lb dyneema fishing line when I want some extra strength in the stitching.
|
|
|
|
|
10-12-2013, 09:21
|
#24
|
|
Moderator Emeritus
Join Date: Oct 2009
Location: Manchester, UK
Boat: Beneteau 473
Posts: 5,591
|
Re: Endura Braid Classic, splice
Evans,
is that heat shrink over the cover instead of a whipping, or is it whipping and heat shrink??
__________________
Nigel
Beneteau 473
Manchester, UK
|
|
|
|
|
10-12-2013, 09:45
|
#25
|
|
Senior Cruiser
Join Date: Aug 2009
Posts: 4,033
|
Re: Endura Braid Classic, splice
and the other end . . . a bit longer splice. There is sewing and whipping under the heat shrink _ I don't think it is needed but it takes no time so why not. You can see the 80lb test spectra mono whipping just at the loop end of this heat shrink. The heat shrink makes everything neat and protects the stitching from UV.
I realize looking at this, if you wanted to take more time, you could have it look prettier by tapering the cover tail under the heat shrink. I have never done that.
Also, One caution about using heat shrink around spectra . . . spectra has a low melting temp, and you can damage it if you go overboard with a heat gun. The safest way to shrink the tube is to stick it in boiling water, which will shrink the tube but not damage the spectra. You can also use a heat gun, but you just have to be gentle.
|
|
|
|
|
10-12-2013, 10:33
|
#26
|
|
Registered User
Join Date: Jun 2009
Location: In transit ( Texas to wherever the wind blows us)
Boat: Pacific Seacraft a Crealock 34
Posts: 4,115
|
Re: Endura Braid Classic, splice
Thanks, very good info.
|
|
|
|
|
10-12-2013, 10:42
|
#27
|
|
Senior Cruiser
Join Date: Aug 2009
Posts: 4,033
|
Re: Endura Braid Classic, splice
Quote:
Originally Posted by Ocean Girl
Thanks, very good info.
|
And I thank you for getting me off my butt . . . like you I was also thinking about a DB line for the boat end of the snubber, primarily to add friction to the cleating (the single braid slipped with a normal cleating but was ok with a tugboat hitch). So, thanks to you, I now have a new boat end piece that I can test next spring.
|
|
|
|
|
10-12-2013, 11:34
|
#28
|
|
Marine Service Provider
Join Date: May 2012
Location: New Orleans
Boat: We have a problem... A serious addiction issue.
Posts: 3,974
|
Re: Endura Braid Classic, splice
Be very careful heat shrinking dyneema. It starts to loose strength at 150c, but even at 100c over time it will start to loose strength. If you are going to heat shrink it, use the boiling water method, but I am hesitant to even do that. If the line touches the bottom of the pot it can cause heat damage pretty easily.
One other thing that crossed my mind last night while making some smaller shackles. When you are done with the diamond knot, and have two tails sticking out the bottom... I always bury one inside the other so it's just one tail, then after cutting the long tail down to about an inch and use a drop of superglue to kept the end from fraying.
It have nothing to do with the strength of the shackle, but until the knot is load set it can still pull out. The bury help keep this from happening, and the superglue keeps the ends from fraying.
__________________
Greg
- If animals weren't meant to be eaten then they wouldn't be made of food.
|
|
|
|
|
10-12-2013, 13:58
|
#29
|
|
Registered User
Join Date: Jun 2009
Location: In transit ( Texas to wherever the wind blows us)
Boat: Pacific Seacraft a Crealock 34
Posts: 4,115
|
Re: Endura Braid Classic, splice
I LOVE the boiling water for heat shrink idea, I've always been unsure about using such heat as we would for an electrical wire heat shrink project. In fact, a couple weeks ago I used heat shrink on some dyneema that passes through a lifeline hole. I was wondering to myself if I was doing more harm than good, but I was really careful about the temp, next time will just try the boiling water trick. There is more controll over the heat. I think the safest way would be to just pour the boiling water in a bowl, that way it is away from direct heat.
:-) my mum was just telling me about using dental floss, kinda funny the gadgets and materials I'm collecting in my bosuns kit.
I have some stitch witch, was going to try that on the diamond knot.
Thanks again 
|
|
|
|
|
10-12-2013, 14:16
|
#30
|
|
Senior Cruiser
Join Date: Aug 2009
Posts: 4,033
|
Re: Endura Braid Classic, splice
^^
In this particular application, the Dacron cover is shielding the dyneema from radiant heat. I suspect it would take a heavy hand to damage the dyneema.
In my lifeline project, I did some testing with DSM and Samson . . . We concluded one needed to be careful, but that it was not hard to shrink the tubing and not damage the dyneema. 130C seemed to be the damage point for limited contact.
However in lifelines, people were using heat shrink as chafe protection and that was not the best idea. A dyneema sleeve was much better chafe protection.
|
|
|
|
|
|
| Thread Tools |
Search this Thread |
|
|
|
| Display Modes |
Rate This Thread |
 Linear Mode Linear Mode
|
|
 Posting Rules
|
You may not post new threads
You may not post replies
You may not post attachments
You may not edit your posts
HTML code is Off
|
|
|
|
Advertise Here

 Recent Discussions Recent Discussions |
|
|
|
|
|
|
|
|
|
|
|
|
|
|
|
|
|
|
|
|
|
|
|
|
|
Vendor Spotlight |
|
|
|
|
|
|
|
|
|


 Mrs. Rain Dog~Ocean Girl


